
Các bạn tạo một project Python, hoặc lấy cái đang sử dụng muốn add thư viện browser-use vào.
Truy cập link https://github.com/browser-use/browser-use có chỉ tại phần Quick start 
Chạy 2 lệnh như hướng dẫn:
With pip (Python>=3.11):
pip install browser-useInstall playwright:
playwright install
Sau đó tạo một file code python để viết code mẫu như hướng dẫn vào xem chạy được liền hay không rồi tính tiếp 😄
from langchain_openai import ChatOpenAI
from browser_use import Agent
import asyncio
from dotenv import load_dotenv
load_dotenv()

async def main():
    agent = Agent(
        task="Compare the price of gpt-4o and DeepSeek-V3",
        llm=ChatOpenAI(model="gpt-4o"),
    )
    await agent.run()

asyncio.run(main())
Anh Tester sử dụng Gemini Key đang miễn phí, get API key tại đây https://ai.google.dev/gemini-api/docs/api-key
Tên models của Gemini hiện tại có thể dùng là "gemini-2.0-flash-exp". Điền vào đoạn code trên xem chạy được không nhen.
Xem các models đang được Browser Use hỗ trợ: https://docs.browser-use.com/customize/supported-models
Tạo file .env nằm ngoài cùng của project Python. Và điền các key model cùng giá trị API vào.
OPENAI_API_KEY=

ANTHROPIC_API_KEY=

AZURE_OPENAI_ENDPOINT=
AZURE_OPENAI_KEY=

GEMINI_API_KEY=

DEEPSEEK_API_KEY=
Code hiện tại khi dùng Gemini model sẽ là:
import asyncio

from langchain_google_genai import ChatGoogleGenerativeAI
from browser_use import Agent
from pydantic import SecretStr
import os
from dotenv import load_dotenv

# Load the environment variables
load_dotenv()

# Get the API key from the environment
api_key = os.getenv("GEMINI_API_KEY")

# Initialize the model
llm = ChatGoogleGenerativeAI(model='gemini-2.0-flash-exp', api_key=SecretStr(os.getenv('GEMINI_API_KEY')))

# Create agent with the model
agent = Agent(
    task="Vào trang web https://www.google.com tìm từ khóa 'anhtester' và click vào link đầu tiên lấy cái câu giới thiệu ra cho tôi.",
    llm=llm
)


async def main():
    await agent.run()


asyncio.run(main())
Cần cài đặt thêm thư viện langchain-google-genai với gợi ý trên PyCharm IDE: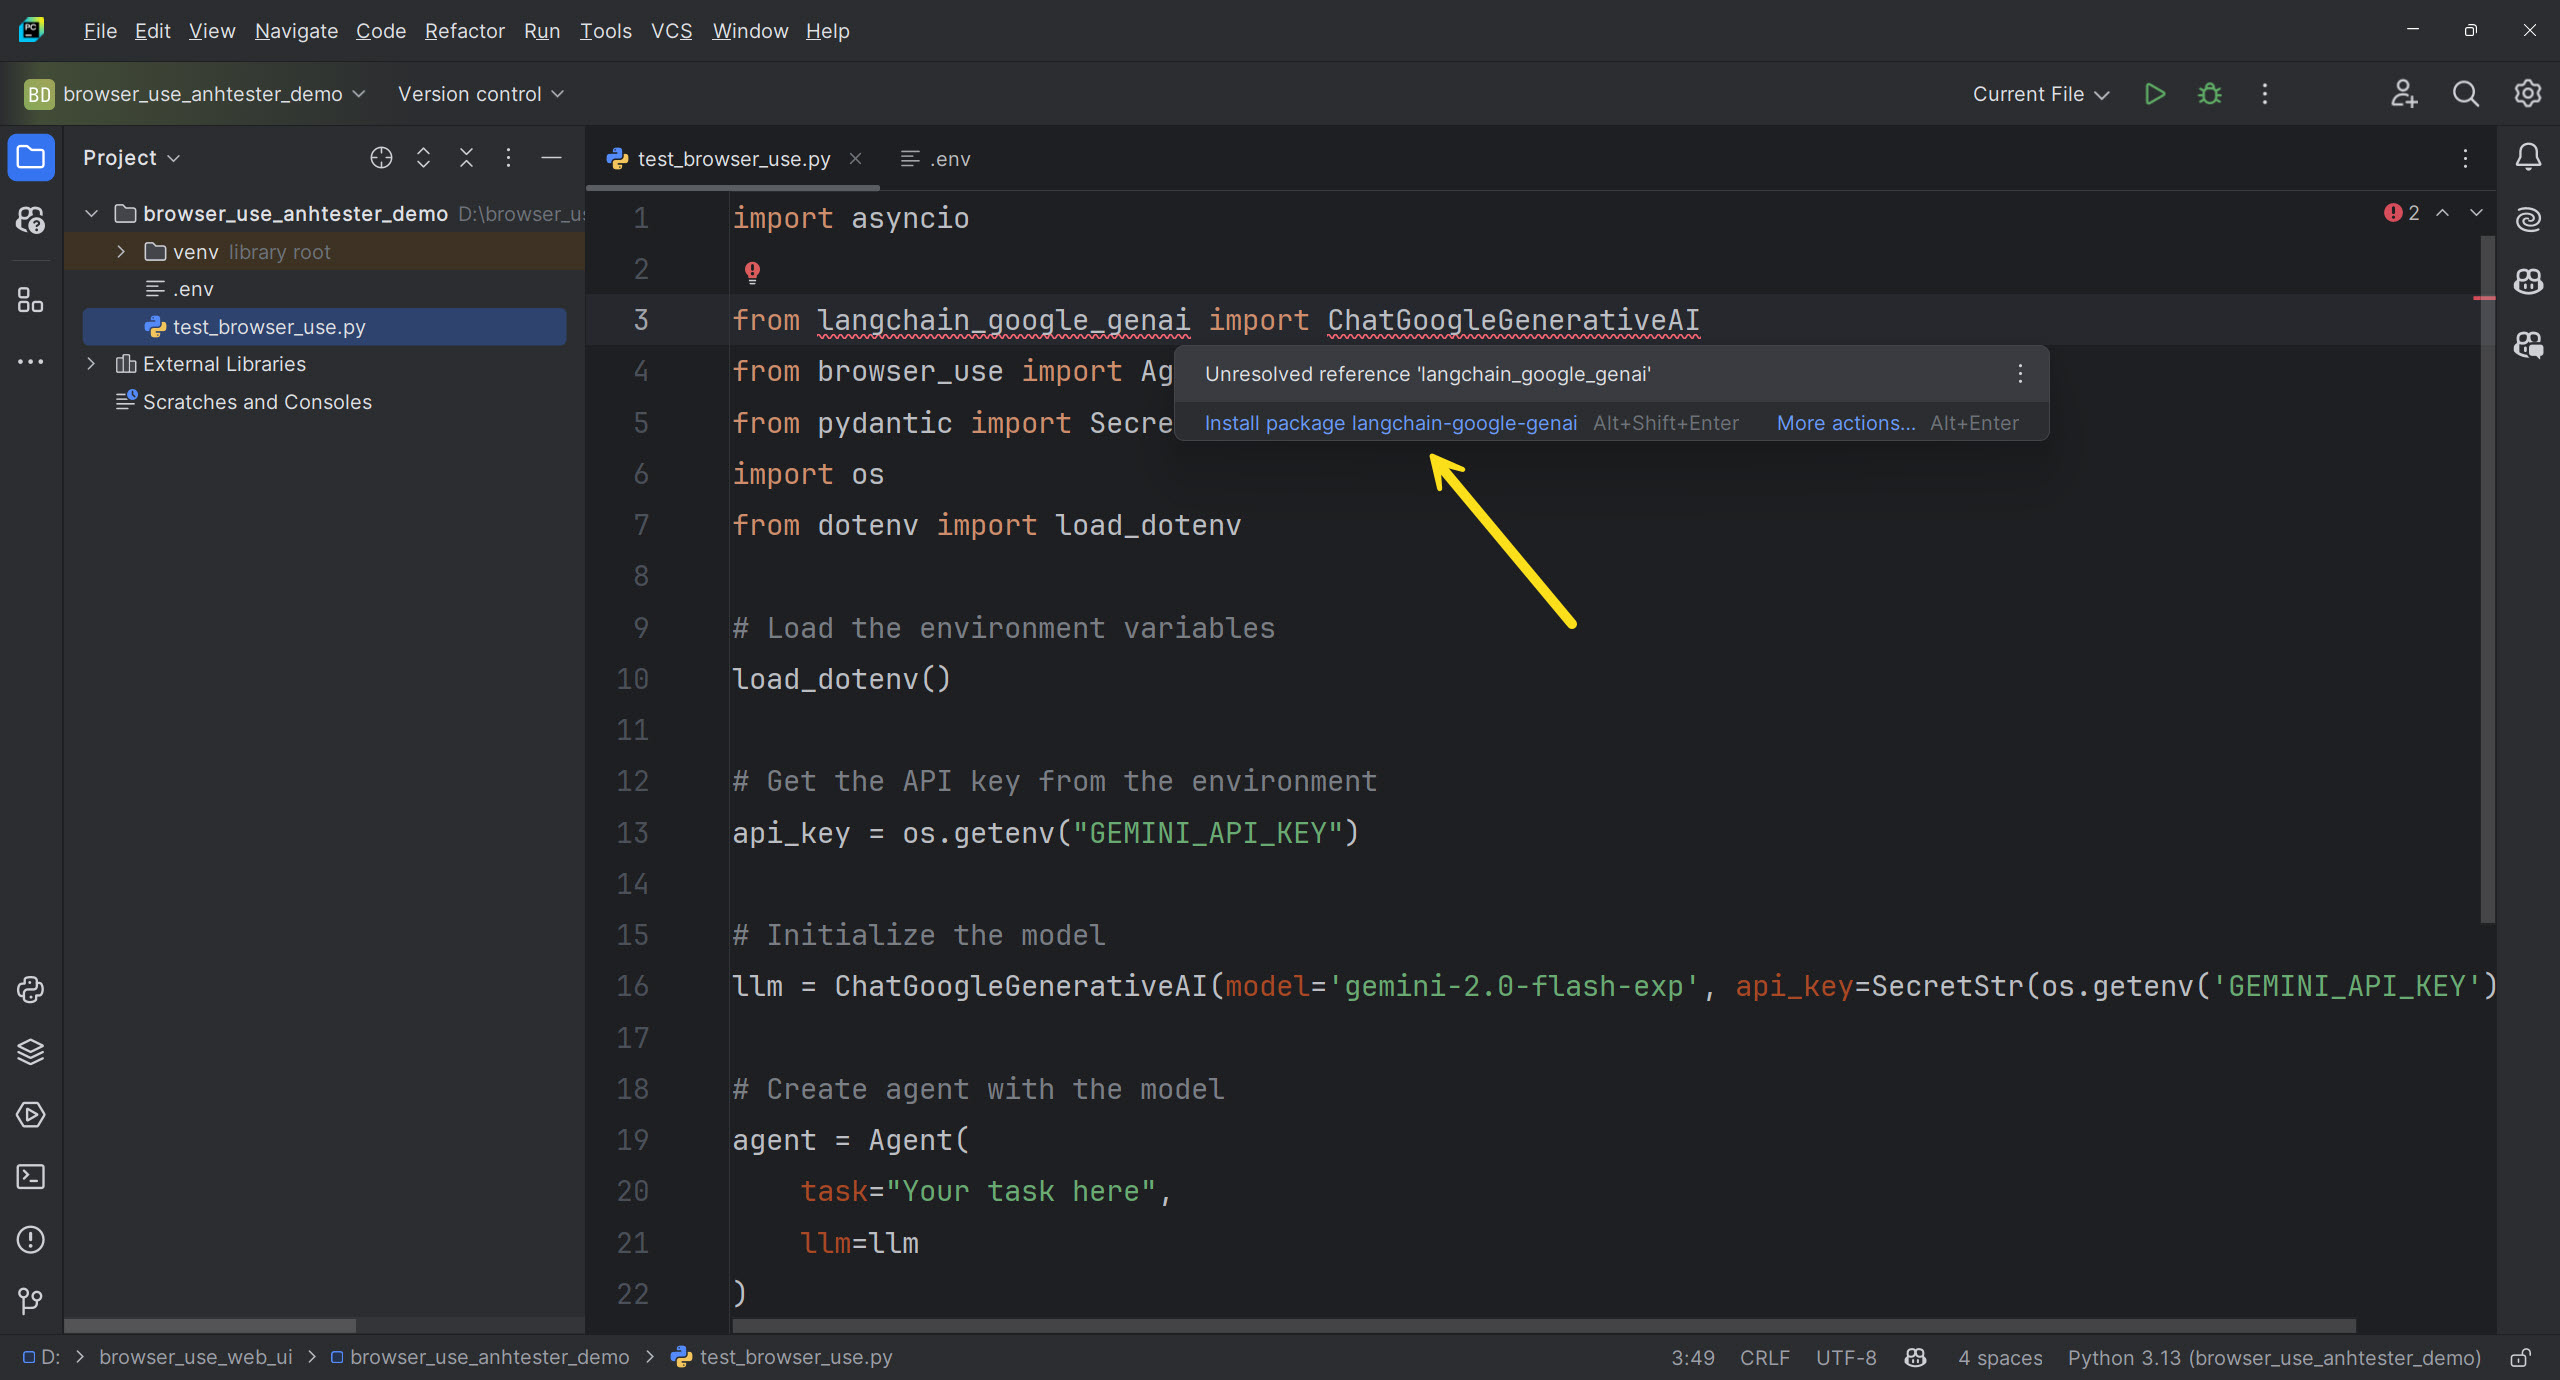
hoặc chạy lệnh PIP sau:
pip install -U langchain-google-genai
Rồi chạy code đi nào những người bạn Tester của tui 🤩
{
  "introduction": "Anh Tester chia sẻ kiến thức Tester, khóa học Testing miễn phí về Automation Testing, Playwright, Selenium C#, Selenium Java, Appium, WinAppDriver, Jenkins, Katalon Studio, akaAT Studio và kiến thức tài liệu về Manual Testing"
}
Quá ngon lành 🎉🎉🎉
Các bạn có thể viết nhiều bước trong một Task với cấu trúc dạng chuỗi mô tả trong Python hỗ trợ như sau:
import asyncio

from langchain_google_genai import ChatGoogleGenerativeAI
from browser_use import Agent
from pydantic import SecretStr
import os
from dotenv import load_dotenv

# Load the environment variables
load_dotenv()

# Get the API key from the environment
api_key = os.getenv("GEMINI_API_KEY")

# Initialize the model
llm = ChatGoogleGenerativeAI(model='gemini-2.0-flash-exp', api_key=SecretStr(os.getenv('GEMINI_API_KEY')))

# Create agent with the model
agent = Agent(
    task='''
        Vào trang web https://www.google.com
        Tìm từ khóa 'anhtester' và click vào link đầu tiên lấy cái câu giới thiệu ra cho tôi
        Tiếp tục click vào menu Blog
        Tìm bài viết có tiêu đề 'API Testing Interview Questions and Answers 2024' và click vào bài viết đó
        Lấy câu trả lời từ câu hỏi 'What is API Testing?' bên trong bài viết đó ra giúp tôi
        ''',
    llm=llm
)


async def main():
    await agent.run()


asyncio.run(main())
Kết quả thì mình thấy nó làm y như mình thao tác tay của một con người luôn, hình như nó có cặp mắt nhìn vào màn hình để đọc hiểu 🤨
Các bạn có thể viết nhiều Task khác nhau cùng nhiều bước hành động.
import asyncio

from langchain_google_genai import ChatGoogleGenerativeAI
from browser_use import Agent
from pydantic import SecretStr
import os
from dotenv import load_dotenv

# Load the environment variables
load_dotenv()

# Get the API key from the environment
api_key = os.getenv("GEMINI_API_KEY")

# Initialize the model
llm = ChatGoogleGenerativeAI(model='gemini-2.0-flash-exp', api_key=SecretStr(os.getenv('GEMINI_API_KEY')))


async def main():
    # Create agent1 with the model
    agent1 = Agent(
        task='''
            Vào trang web https://anhtester.com
            Tìm khoá học có tên 'Khoá học Python dành cho Tester'
            Lấy thông tin học phí ra giúp tôi
            ''',
        llm=llm
    )
    await agent1.run()

    # Create agent2 with the model
    agent2 = Agent(
        task='''
            Go to 'https://crm.anhtester.com/admin/authentication'
            Login with email and password: 'admin@example.com' and '123456'
            Click menu Customers to open the Customer page
            Search the customer 'Anh Tester' on search field in customer page
            Get the Company column of the table
            Verify the Company column results contains 'Anh Tester' value on table
            ''',
        llm=llm
    )
    await agent2.run()


asyncio.run(main())
Tới đây tắt máy nghỉ được rồi đó 😄😄
Browser Use hỗ trợ mình trích xuất kết quả từ Agent khi chạy xong cho chúng ta kiểm tra assert lại xem đúng không, rất hay đối với Tester để hỗ trợ kiểm thử tự động được rồi.
Xem docs Custom Output Format tại đây: https://docs.browser-use.com/customize/output-format
Xem docs Agent History tại đây: https://docs.browser-use.com/customize/agent-settings
Danh sách Agent History cung cấp nhiều phương thức hỗ trợ để phân tích quá trình thực thi:
final_result(): Lấy nội dung cuối cùng đã trích xuấtis_done(): Kiểm tra xem tác vụ có hoàn thành thành công hay khônghas_errors(): Kiểm tra xem có lỗi nào xảy ra khôngmodel_thoughts(): Lấy quá trình suy luận của agentaction_results(): Lấy kết quả của tất cả các hành độngfinal_result() để truy xuất kết quả từ tham số trong class cấu trúc đã xây dựng.import asyncio
from browser_use.controller.service import Controller
from langchain_google_genai import ChatGoogleGenerativeAI
from browser_use import Agent
from pydantic import SecretStr, BaseModel
import os
from dotenv import load_dotenv
import json
# Load the environment variables
load_dotenv()
# Get the API key from the environment
api_key = os.getenv("GEMINI_API_KEY")
# Initialize the model
llm = ChatGoogleGenerativeAI(model='gemini-2.0-flash-exp', api_key=SecretStr(os.getenv('GEMINI_API_KEY')))
class ExtractResults(BaseModel):
anhtester_page_introduction: str
api_answer: str
controller = Controller(output_model=ExtractResults)
# Create agent with the model
agent = Agent(
task='''
Vào trang web https://www.google.com
Tìm từ khóa 'anhtester' và click vào link đầu tiên lấy cái câu giới thiệu ra cho tôi
Tiếp tục click vào menu Blog
Tìm bài viết có tiêu đề 'API Testing Interview Questions and Answers 2024' và click vào bài viết đó
Lấy câu trả lời từ câu hỏi 'What is API Testing?' bên trong bài viết đó ra giúp tôi
''',
llm=llm,
controller=controller
)
async def main():
history = await agent.run()
result = history.final_result() # Lấy kết quả cuối cùng
result_dict = json.loads(result) # Chuyển đổi chuỗi JSON thành dictionary
# Truy xuất dữ liệu
print(f"\nKết quả Introduction: {result_dict["anhtester_page_introduction"]}") # Xem kết quả
print(f"\nKết quả API Answer: {result_dict["api_answer"]}")
# Kiểm tra kết quả với các giá trị mong muốn (so sánh chứa chuỗi)
assert "Anh Tester chia sẻ kiến thức Tester" in result_dict["anhtester_page_introduction"]
assert "API Testing is a type of software testing" in result_dict["api_answer"]
asyncio.run(main())
class ExtractResults(BaseModel):
anhtester_page_introduction: str
api_answer: str
BaseModel là class của browser use hỗ trợ cần truyền như vậy như docs hướng dẫn.
Tiếp theo là khởi tạo Controller để truyển class đã xây dựng vào:
controller = Controller(output_model=ExtractResults)
Và trong tham số của Agent() có thuộc tính controller để truyền vào:
agent = Agent(
    task=task,
    llm=llm,
    controller=controller
)
Cuối cùng khi gọi chạy agent.run() thì gán cho nó một biến ví dụ "history" sau đó gọi hàm final_result() để truy xuất kết quả:
history = await agent.run()

result = history.final_result() # Lấy kết quả cuối cùng

result_dict = json.loads(result)  # Chuyển đổi chuỗi JSON thành dictionary
Bạn có thể dùng assert trong Playwright hỗ trợ để kiểm tra kết quả đúng sai như mong đợi.
Xem thêm cú pháp assert của Python để hiểu nhiều hơn.
Trong Python, assert là một câu lệnh dùng để kiểm tra điều kiện. Nếu điều kiện đúng, chương trình tiếp tục chạy. Nếu điều kiện sai, nó ném ra lỗi AssertionError.
Browser Use cung cấp 2 class BrowserConfig và BrowserContextConfig để bạn điền các giá trị tương ứng các tham số được cung cấp sẵn để cấu hình browser khi chạy Agent thay cho cấu hình gốc từ Playwright Python.
Ví dụ bạn muốn thay đổi kích cỡ trình duyệt khi chạy, muốn set timeout cho waits, muốn bật tắt highlight element từ AI, muốn xuất record video,...
import asyncio

from browser_use.browser.browser import Browser, BrowserConfig
from browser_use.browser.context import BrowserContext, BrowserContextConfig
from langchain_google_genai import ChatGoogleGenerativeAI
from browser_use import Agent
from pydantic import SecretStr
import os
from dotenv import load_dotenv

# Load the environment variables
load_dotenv()

# Get the API key from the environment
api_key = os.getenv("GEMINI_API_KEY")

# Initialize the model
llm = ChatGoogleGenerativeAI(model='gemini-2.0-flash-exp', api_key=SecretStr(os.getenv('GEMINI_API_KEY')))

# Create BrowserConfig of Browser Use provided
browser_config = BrowserConfig(
    headless=False,
    disable_security=True
)

# Create browser instance with the BrowserConfig
browser = Browser(config=browser_config)

# Ensure project_root is a string
project_root = os.path.abspath(os.path.join(os.path.dirname(__file__), '.'))
recording_path = os.path.join(project_root, 'exports', 'recordings')
trace_path = os.path.join(project_root, 'exports', 'traces')

# Create the directory if it does not exist
if not os.path.exists(recording_path):
    os.makedirs(recording_path)
if not os.path.exists(trace_path):
    os.makedirs(trace_path)

# Create BrowserContextConfig of Browser Use provided
browser_context_config = BrowserContextConfig(
    wait_for_network_idle_page_load_time=3.0,
    browser_window_size={'width': 1600, 'height': 900},
    locale='vi-VN',
    highlight_elements=True,
    viewport_expansion=-1,
    save_recording_path=os.path.join(project_root, 'exports', 'recordings'),
    trace_path=os.path.join(project_root, 'exports', 'traces')
)

# Create browser context with the BrowserContextConfig
browser_context = BrowserContext(
    browser=browser,
    config=browser_context_config
)

# Create agent with the model and browser context
agent = Agent(
    task="Vào trang web https://www.google.com tìm từ khóa 'anhtester' và click vào link đầu tiên lấy cái câu giới thiệu ra cho tôi.",
    llm=llm,
    browser_context=browser_context
)


async def main():
    await agent.run()

    # Close the browser context and browser
    await browser_context.close()
    await browser.close()


asyncio.run(main())
Mô tả các giá trị thuộc tính trong BrowserConfig
"""
	Configuration for the Browser.

	Default values:
		headless: True
			Whether to run browser in headless mode

		disable_security: True
			Disable browser security features

		extra_chromium_args: []
			Extra arguments to pass to the browser

		wss_url: None
			Connect to a browser instance via WebSocket

		cdp_url: None
			Connect to a browser instance via CDP

		chrome_instance_path: None
			Path to a Chrome instance to use to connect to your normal browser
			e.g. '/Applications/Google\ Chrome.app/Contents/MacOS/Google\ Chrome'
"""
Mô tả các giá trị thuộc tính trong BrowserContext
"""
	Configuration for the BrowserContext.

	Default values:
	    cookies_file: None
	        Path to cookies file for persistence

	        disable_security: True
	                Disable browser security features

	    minimum_wait_page_load_time: 0.5
	        Minimum time to wait before getting page state for LLM input

	        wait_for_network_idle_page_load_time: 1.0
	                Time to wait for network requests to finish before getting page state.
	                Lower values may result in incomplete page loads.

	    maximum_wait_page_load_time: 5.0
	        Maximum time to wait for page load before proceeding anyway

	    wait_between_actions: 1.0
	        Time to wait between multiple per step actions

	    browser_window_size: {
	            'width': 1280,
	            'height': 1100,
	        }
	        Default browser window size

	    no_viewport: False
	        Disable viewport

	    save_recording_path: None
	        Path to save video recordings

	    save_downloads_path: None
	        Path to save downloads to

	    trace_path: None
	        Path to save trace files. It will auto name the file with the TRACE_PATH/{context_id}.zip

	    locale: None
	        Specify user locale, for example en-GB, de-DE, etc. Locale will affect navigator.language value, Accept-Language request header value as well as number and date formatting rules. If not provided, defaults to the system default locale.

	    user_agent: 'Mozilla/5.0 (Windows NT 10.0; Win64; x64) AppleWebKit/537.36 (KHTML, like Gecko) Chrome/85.0.4183.102 Safari/537.36'
	        custom user agent to use.

	    highlight_elements: True
	        Highlight elements in the DOM on the screen

	    viewport_expansion: 500
	        Viewport expansion in pixels. This amount will increase the number of elements which are included in the state what the LLM will see. If set to -1, all elements will be included (this leads to high token usage). If set to 0, only the elements which are visible in the viewport will be included.

	    allowed_domains: None
	        List of allowed domains that can be accessed. If None, all domains are allowed.
	        Example: ['example.com', 'api.example.com']

	    include_dynamic_attributes: bool = True
	        Include dynamic attributes in the CSS selector. If you want to reuse the css_selectors, it might be better to set this to False.
"""
Các thuộc tính của Chromium Command Line (extra_chromium_args: []) xem tại đây:
https://gist.github.com/dodying/34ea4760a699b47825a766051f47d43b
Mở source code web-ui lên sau đó làm tương tự project Python bình thường đã hướng dẫn bên trên 😁
Tuy nhiên không cần cài đặt các thư viện như bên trên, vì trong source web-ui đã có sẵn các thư viện.
🌱 Facebook
Fanpage: Anh Tester
🌱
Telegram Automation Testing:
Cộng đồng Automation Testing
🌱 Facebook Group Automation:
Cộng đồng Automation
Testing Việt Nam
🌱
Telegram Manual Testing:
Cộng đồng Manual Testing
🌱 Facebook
Group Manual:
Cộng đồng Manual Testing Việt Nam
Copyright © 2021-2026 Anh Tester Automation Testing

 Zalo
Zalo


Anh Tester
Đường dẫu khó chân vẫn cần bước đi
Đời dẫu khổ tâm vẫn cần nghĩ thấu