![[Appium Java] Bài 8 - Cách xác định Locators của Element trên mobile với Appium Inspector](/uploads/course/banner_course_appium_java_online_anh_tester.jpg)
NỘI DUNG BÀI HỌC
✅Cách xác định Locators trên Appium Inspector
✅Cách record Locators trên Appium Inspector
✅Các dạng Locators được Appium Inspector hỗ trợ
✅Xác định locators dựa vào XPATH axes (tương đối)
✅Locators là gì?
Trong Test Automation trên giao diện UI thì Locators là cách để xác định và tương tác với các phần tử trên giao diện (UI elements) trong một ứng dụng di động hoặc website. Đây là một thành phần quan trọng để viết các bài kiểm thử tự động. Locators giúp bạn tìm kiếm các phần tử trên giao diện, ví dụ như button, input, checkbox, hoặc các thành phần khác.
Locator trên Mobile UI dùng Appium Inspector để xác định:
Locator trên Web UI dùng SelectorsHub để xác định:
✅Cách xác định Locators trên Appium Inspector
- Chọn tab mũi tên Select Elements.
- Click chọn element cần lấy locator, sẽ được gợi ý highlight màu vàng trên phần UI.
- Kiểm tra cây thư mục element vùng nằm giữa.
- Kiểm tra giá trị các loại locators vùng nằm bên phải.
- Copy giá trị dán vào code Appium Java để chạy test automation.

✅Cách record Locators trên Appium Inspector
- Chọn tab Start Recording
- Click chọn element cần thao tác
- Điền text đối với element là dạng input hoặc textbox

- Click nút Send Keys hoặc Clear đối với textbox
- Click chọn nút Tab để click vào element

- Click chọn tab Recorder, code sẽ được tự động sinh ra tương ứng với các thao tác trên (Code Snippet)
- Chọn loại ngôn ngữ lập trình cần generate code

- Khi đó sẽ thấy được các dạng locator mà tools bắt được theo gợi ý của tools Appium Inspector.
✅Các dạng Locators được Appium Inspector hỗ trợ
Dưới đây là các loại locators mà Appium hỗ trợ:
-
ID
- Dùng để xác định một phần tử dựa trên thuộc tính
resource-id(trên Android) hoặcaccessibilityIdentifier(trên iOS). - Ví dụ:
- Dùng để xác định một phần tử dựa trên thuộc tính
-
Accessibility ID
- Được sử dụng để tìm phần tử thông qua
content-desc(Android) hoặcaccessibilityIdentifier(iOS).
- Đây là cách tiếp cận tốt nhất khi viết bài kiểm thử đa nền tảng.
- Ví dụ:
- Được sử dụng để tìm phần tử thông qua
-
XPath
- Xác định phần tử dựa trên cấu trúc XML. Đây là cách linh hoạt nhất nhưng cũng chậm nhất. Tuy nhiên cũng không chậm lắm đâu, cứ dùng thoải mái. Xpath hỗ trợ rất nhiều cú pháp tìm kiếm hay và gọn, cần nắm rõ các cú pháp thì mới dùng chuẩn xác hơn ổn định hơn.

- Ví dụ:
- Xác định phần tử dựa trên cấu trúc XML. Đây là cách linh hoạt nhất nhưng cũng chậm nhất. Tuy nhiên cũng không chậm lắm đâu, cứ dùng thoải mái. Xpath hỗ trợ rất nhiều cú pháp tìm kiếm hay và gọn, cần nắm rõ các cú pháp thì mới dùng chuẩn xác hơn ổn định hơn.
-
Class Name
- Tìm phần tử dựa trên tên lớp của nó (ví dụ:
android.widget.ImageViewhoặcXCUIElementTypeButton). Cách này ít được dùng vì nó dễ bị trùng lặp nhiều element.
- Ví dụ:
- Tìm phần tử dựa trên tên lớp của nó (ví dụ:
-
UIAutomator (Android)
- Sử dụng cú pháp của UIAutomator (framework của Android) để xác định phần tử. Chỉ hỗ trợ cho Android, nên ít được dùng khi test cả iOS.

- Ví dụ:
driver.findElement(AppiumBy.androidUIAutomator("new UiSelector().text(\"Sauce Labs Backpack\")"));
- Sử dụng cú pháp của UIAutomator (framework của Android) để xác định phần tử. Chỉ hỗ trợ cho Android, nên ít được dùng khi test cả iOS.
-
iOS Predicate String (iOS)
- Sử dụng câu truy vấn predicate để tìm phần tử trên iOS.
- Ví dụ:
driver.findElement(AppiumBy.iOSNsPredicateString("type == 'XCUIElementTypeButton' AND label == 'Submit'"));
Chọn locators như thế nào?
- Ưu tiên sử dụng
Accessibility IDhoặcID: Đây là cách nhanh nhất và đáng tin cậy nhất. - Sau đó dùng
XPath: Mặc dù linh hoạt, nhưng nó chậm hơn so với các locators khác. - Luôn kiểm tra tính duy nhất của locator: Một locator nên xác định chính xác một phần tử duy nhất trên màn hình.
✅Xác định locators dựa vào XPATH axes (tương đối)
XPath axes là một khái niệm trong XPath (XML Path Language), được sử dụng để xác định mối quan hệ giữa các nút (nodes) trong tài liệu XML. Axes giúp bạn chọn các nút liên quan đến một nút hiện tại (current node) dựa trên vị trí và mối quan hệ của chúng trong cây XML.
Giả sử giao diện ứng dụng Android Mobile có cấu trúc XML như sau:
<android.widget.LinearLayout>
    <android.widget.TextView text="Header" />
    <android.widget.LinearLayout>
        <android.widget.TextView text="Item 1" />
        <android.widget.TextView text="Item 2" />
        <android.widget.TextView text="Item 3" />
    </android.widget.LinearLayout>
    <android.widget.Button text="Submit" />
</android.widget.LinearLayout>
1. Xác định element dựa vào thuộc tính của một phần tử (attribute)
Thuộc tính là các tên từ khoá màu Tím Tím trong các thẻ tag source.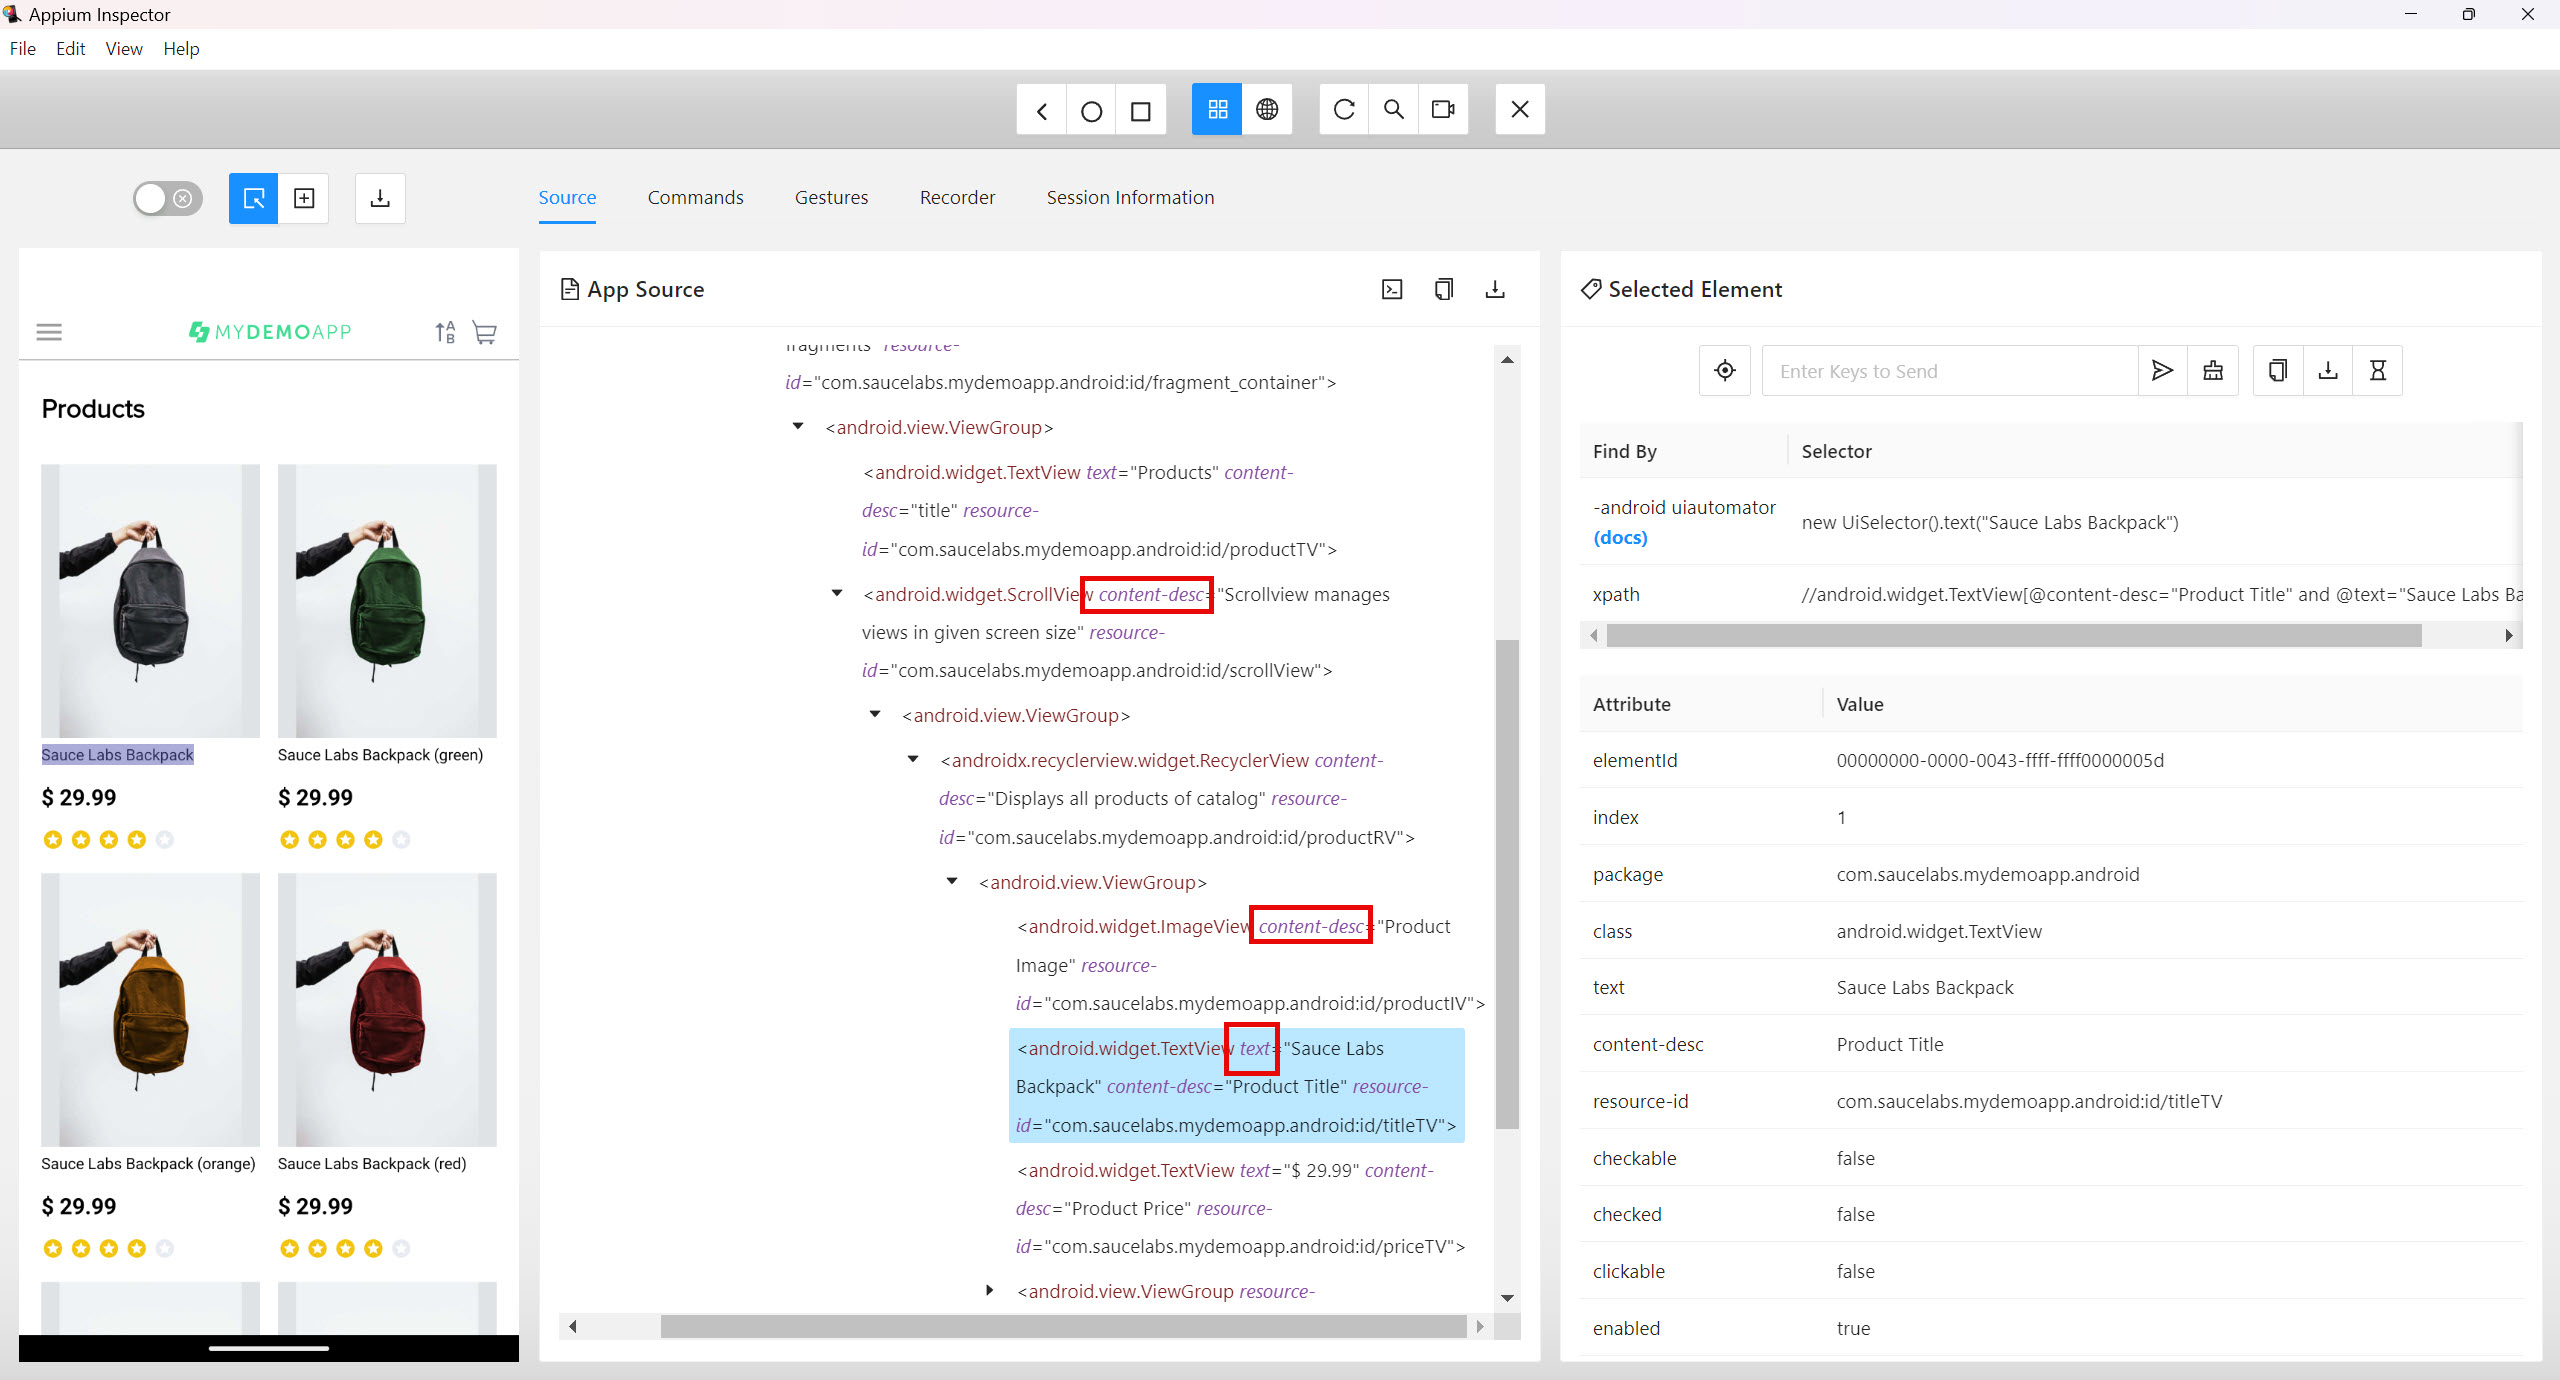
Ví dụ mẫu: Lấy giá trị của thuộc tính text cho nút Submit:
Chúng ta dùng kí hiệu @ để gọi tên thuộc tính và bằng với giá trị của thuộc tính đó, đặt trong dấu nháy đơn.
WebElement submitButton = driver.findElement(By.xpath("//android.widget.Button[@text='Submit']"));
String textValue = submitButton.getAttribute("text");
System.out.println("Button text: " + textValue);
Ví dụ thực tế: lấy tên sản phẩm dựa vào thuộc tính text với giá trị Sauce Labs Backpack
WebElement productName = driver.findElement(By.xpath("//android.widget.TextView[@text='Sauce Labs Backpack']"));
String textValue = productName.getAttribute("text");
System.out.println("Product name: " + textValue);
Ngoài ra còn có thể dựa vào các thuộc tính khác như:
//android.widget.TextView[@resource-id='com.saucelabs.mydemoapp.android:id/titleTV']
//android.widget.TextView[@content-desc='Product Title']
Nguyên tắc là chúng ta dùng kí hiệu @ để gọi tên thuộc tính bất kì và bằng với giá trị của thuộc tính đó, đặt trong dấu nháy đơn.
Tuỳ vào kết quả trả ra 1 element hoặc nhiều elements thì chúng ta dùng WebElement hoặc List<WebElement> để nhận kết quả trả về.
List<WebElement> productTitles = driver.findElements(By.xpath("//android.widget.TextView[@content-desc='Product Title']"));
for (WebElement item : productTitles) {
    System.out.println(item.getAttribute("text"));
}
2. Sử dụng XPath để tìm phần tử dựa trên text
Dùng cú pháp XPath để chọn phần tử dựa trên giá trị của thuộc tính text. Đây là cách được sử dụng nhiều khi dùng đến cú pháp XPath.
Vì đôi khi các thuộc tính khác lại ít tồn tại sẵn trên giao diện, do anh bạn Developer không bỏ thuộc tính đầy đủ vào như id, accessibility id.
Khác biệt của TEXT giữa Mobile và Web là:
- Trên web thì text nằm bên trong cặp thẻ html
VD: <h1 class="tw-text-2xl tw-text-neutral-800">Login</h1>
- Trên mobile thì text là một thuộc tính "text"
Ví dụ mẫu: Tìm nút có text="Submit"
WebElement submitButton = driver.findElement(By.xpath("//android.widget.Button[@text='Submit']"));
submitButton.click();
Ví dụ thực tế về text trên app mobile:

Ví dụ: lấy tên sản phẩm dựa vào text Sauce Labs Backpack (green)
WebElement productName = driver.findElement(By.xpath("//android.widget.TextView[@text='Sauce Labs Backpack (green)']"));
String textValue = productName.getAttribute("text");
System.out.println("Product name: " + textValue);
Ví dụ 2: Tìm tất cả các phần tử có text="Item 1"
Nếu muốn lấy danh sách các phần tử có cùng text thì khi đó dùng hàm tìm kiếm là findElements và dùng List<WebElement> để chứa kết quả, vì khi đó kết quả sẽ trả ra một hoặc nhiều element:
List<WebElement> items = driver.findElements(By.xpath("//android.widget.TextView[@text='Item 1']"));
for (WebElement item : items) {
    System.out.println(item.getAttribute("text"));
}
3. Sử dụng contains() để tìm phần tử chứa một phần của text
Khi text không hoàn toàn khớp, bạn có thể sử dụng hàm contains() trong XPath để tìm kiếm chứa giá trị nằm ở đầu ở giữa và ở cuối đều được.
Ví dụ: Tìm phần tử có text chứa từ "Item":
WebElement element = driver.findElement(By.xpath("//*[contains(@text, 'Item')]"));
System.out.println("Found element with text: " + element.getAttribute("text"));
Ngoài ra chúng ta có thể tìm phần tử chứa giá trị ở đầu với hàm starts-with
WebElement element = driver.findElement(By.xpath("//*[starts-with(@text, '$')]"));
System.out.println("Found element start with: " + element.getAttribute("text"));
Tìm phần tử chứa giá trị ở cuối với hàm ends-with
WebElement element = driver.findElement(By.xpath("//*[ends-with(@text, '.99')]"));
System.out.println("Found element start with: " + element.getAttribute("text"));
4. Tìm phần tử với text bất chấp chữ hoa/thường
Sử dụng hàm translate() trong XPath để chuyển tất cả text về chữ thường hoặc chữ hoa trước khi so sánh.
Ví dụ: Tìm phần tử có text="submit" bất kể viết hoa/thường:
WebElement element = driver.findElement(By.xpath("//*[translate(@text, 'ABCDEFGHIJKLMNOPQRSTUVWXYZ', 'abcdefghijklmnopqrstuvwxyz')='submit']"));
element.click();
WebElement productName2 = driver.findElement(By.xpath("//android.widget.TextView[translate(@text, 'ABCDEFGHIJKLMNOPQRSTUVWXYZ', 'abcdefghijklmnopqrstuvwxyz')='sauce labs backpack']"));
String textValue2 = productName2.getAttribute("text");
System.out.println("Product name: " + textValue2);
5. Kết hợp text và các điều kiện khác
Bạn có thể kết hợp điều kiện text với các thuộc tính khác, như class hoặc id:
Ví dụ: Tìm phần tử trong phần TextView có text="Item 1" và thuộc class cụ thể:
WebElement element = driver.findElement(By.xpath("//android.widget.TextView[@text='Item 1' and @class='android.widget.TextView']"));
System.out.println("Element found: " + element.getAttribute("text"));
Ví dụ thực tế lấy tên sản phẩm dựa vào thuộc tính content-desc và text
//android.widget.TextView[@content-desc='Product Title' and @text='Sauce Labs Backpack']Ngoài ra các bạn còn có thể dùng or thay vì and
//android.widget.TextView[@content-desc='Product Title' or @text='Sauce Labs Backpack']- and thì cả 2 điều kiện đều đúng nó mới cho ra kết quả
- or thì chỉ cần một trong hai điều kiện đúng là có kết quả cho cái điều kiện đúng đó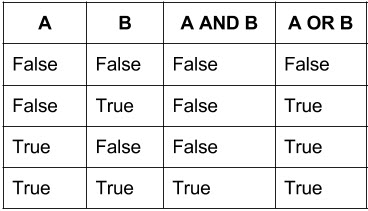
WebElement productName3 = driver.findElement(By.xpath("//android.widget.TextView[@content-desc='Product Title' and @text='Sauce Labs Backpack']"));
String textValue3 = productName3.getAttribute("text");
System.out.println("Product name: " + textValue3);
6. Chọn phần tử con trực tiếp (child::)
Giả sử bạn muốn tìm tất cả các nút con của android.widget.LinearLayout:
WebElement parentElement = driver.findElement(By.xpath("//android.widget.LinearLayout"));
List<WebElement> childElements = parentElement.findElements(By.xpath("child::*"));
for (WebElement element : childElements) {
    System.out.println(element.getAttribute("text"));
}
Hoặc có thể viết liền nhau không cần tạo ra 2 đối tượng element, dùng kí hiệu /child::
List<WebElement> childElements = driver.findElements(By.xpath("//android.widget.LinearLayout/child::*"));
for (WebElement element : childElements) {
    System.out.println(element.getAttribute("text"));
}
Ví dụ thực tế: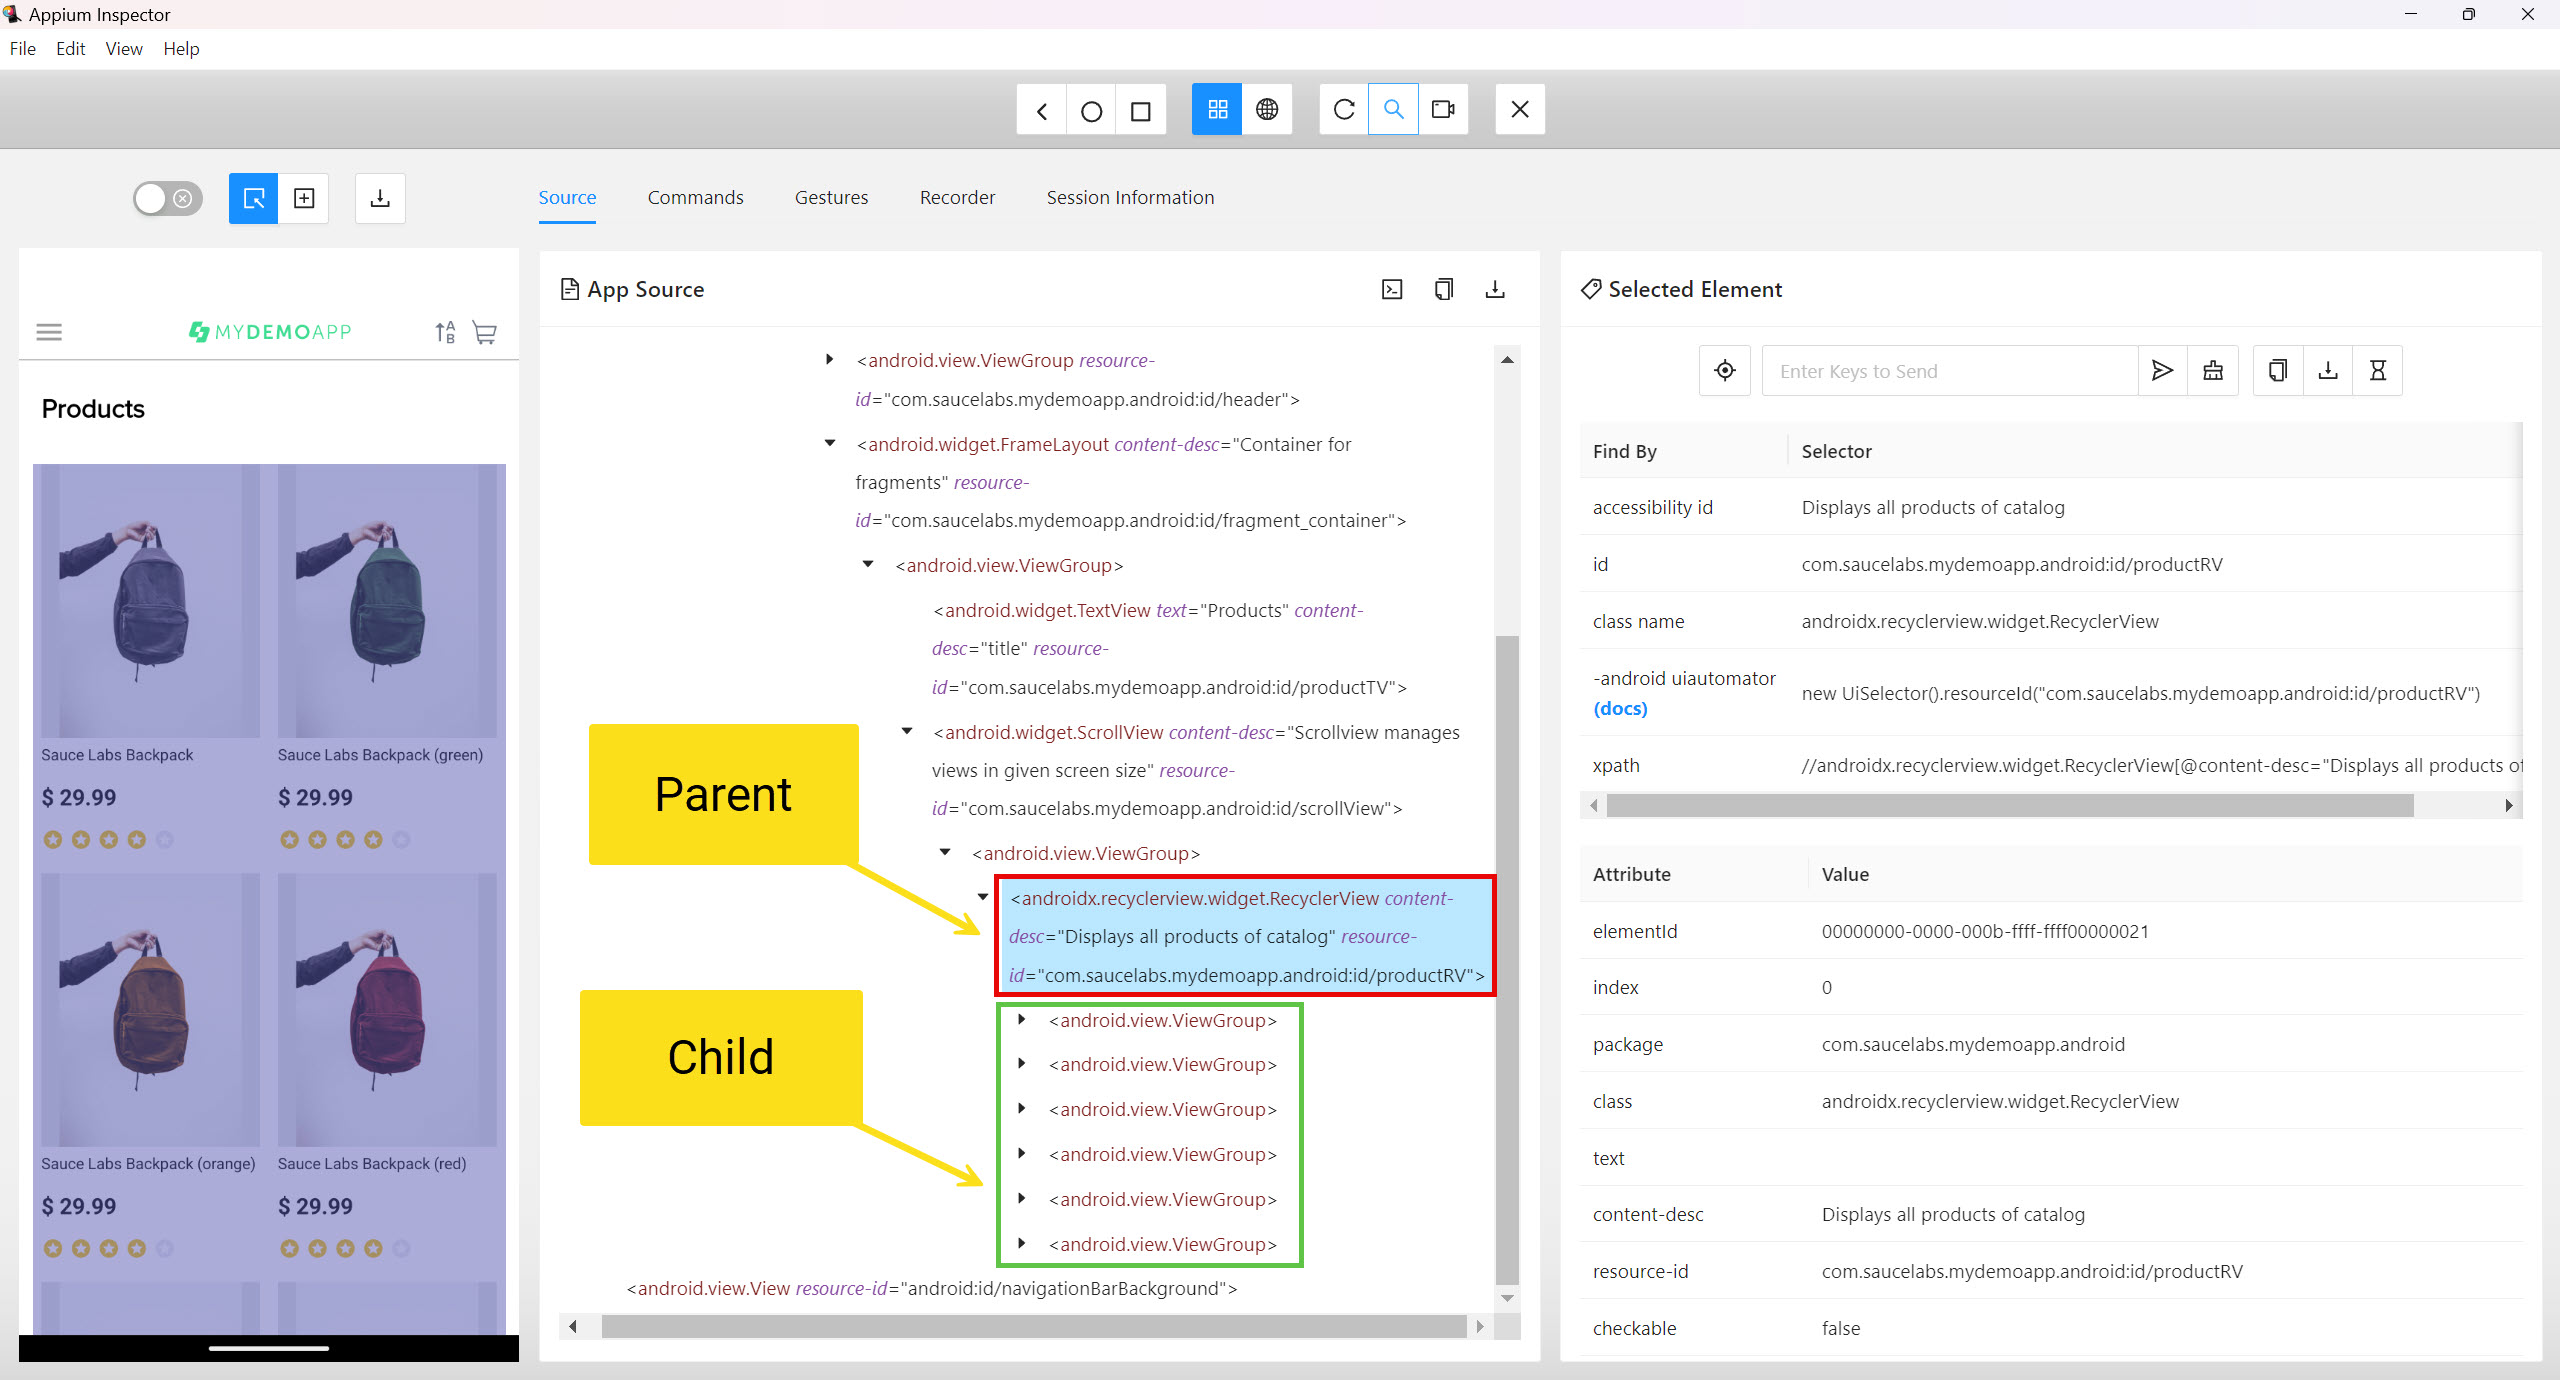
//Lấy hết danh sách các element con android.view.ViewGroup
List<WebElement> elements = driver.findElements(By.xpath("//androidx.recyclerview.widget.RecyclerView[@content-desc='Displays all products of catalog']/child::android.view.ViewGroup"));

//Lấy 1 element con thứ 2
WebElement element2 = driver.findElement(By.xpath("//androidx.recyclerview.widget.RecyclerView[@content-desc='Displays all products of catalog']/child::android.view.ViewGroup[2]"));
Chọn phần tử con trực tiếp dùng dấu / thay cho child::
//Lấy hết danh sách các element con android.view.ViewGroup
List<WebElement> elements = driver.findElements(By.xpath("//androidx.recyclerview.widget.RecyclerView[@content-desc='Displays all products of catalog']/android.view.ViewGroup"));

//Lấy 1 element con thứ 2
WebElement element2 = driver.findElement(By.xpath("//androidx.recyclerview.widget.RecyclerView[@content-desc='Displays all products of catalog']/android.view.ViewGroup[2]"));
7. Chọn phần tử tổ tiên (ancestor::)
Tìm nút tổ tiên của phần tử Submit:
WebElement submitButton = driver.findElement(By.xpath("//android.widget.Button[@text='Submit']"));
WebElement ancestorElement = submitButton.findElement(By.xpath("ancestor::android.widget.LinearLayout"));
System.out.println("Ancestor found: " + ancestorElement.getTagName());
Hoặc có thể viết liền nhau không cần tạo ra 2 đối tượng element, dùng kí hiệu /ancestor::
WebElement ancestorElement = driver.findElement(By.xpath("//android.widget.Button[@text='Submit']/ancestor::android.widget.LinearLayout"));
System.out.println("Ancestor found: " + ancestorElement.getTagName());
8. Chọn phần tử con cháu (descendant::)
Tìm các nút con cháu của phần tử android.widget.LinearLayout:
WebElement descendantElement = driver.findElement(By.xpath("//android.widget.LinearLayout/descendant::*"));
System.out.println("Descendant found: " + descendantElement.getTagName());
Bao gồm cả con và cháu (những thẻ nằm bên trong thẻ gốc)
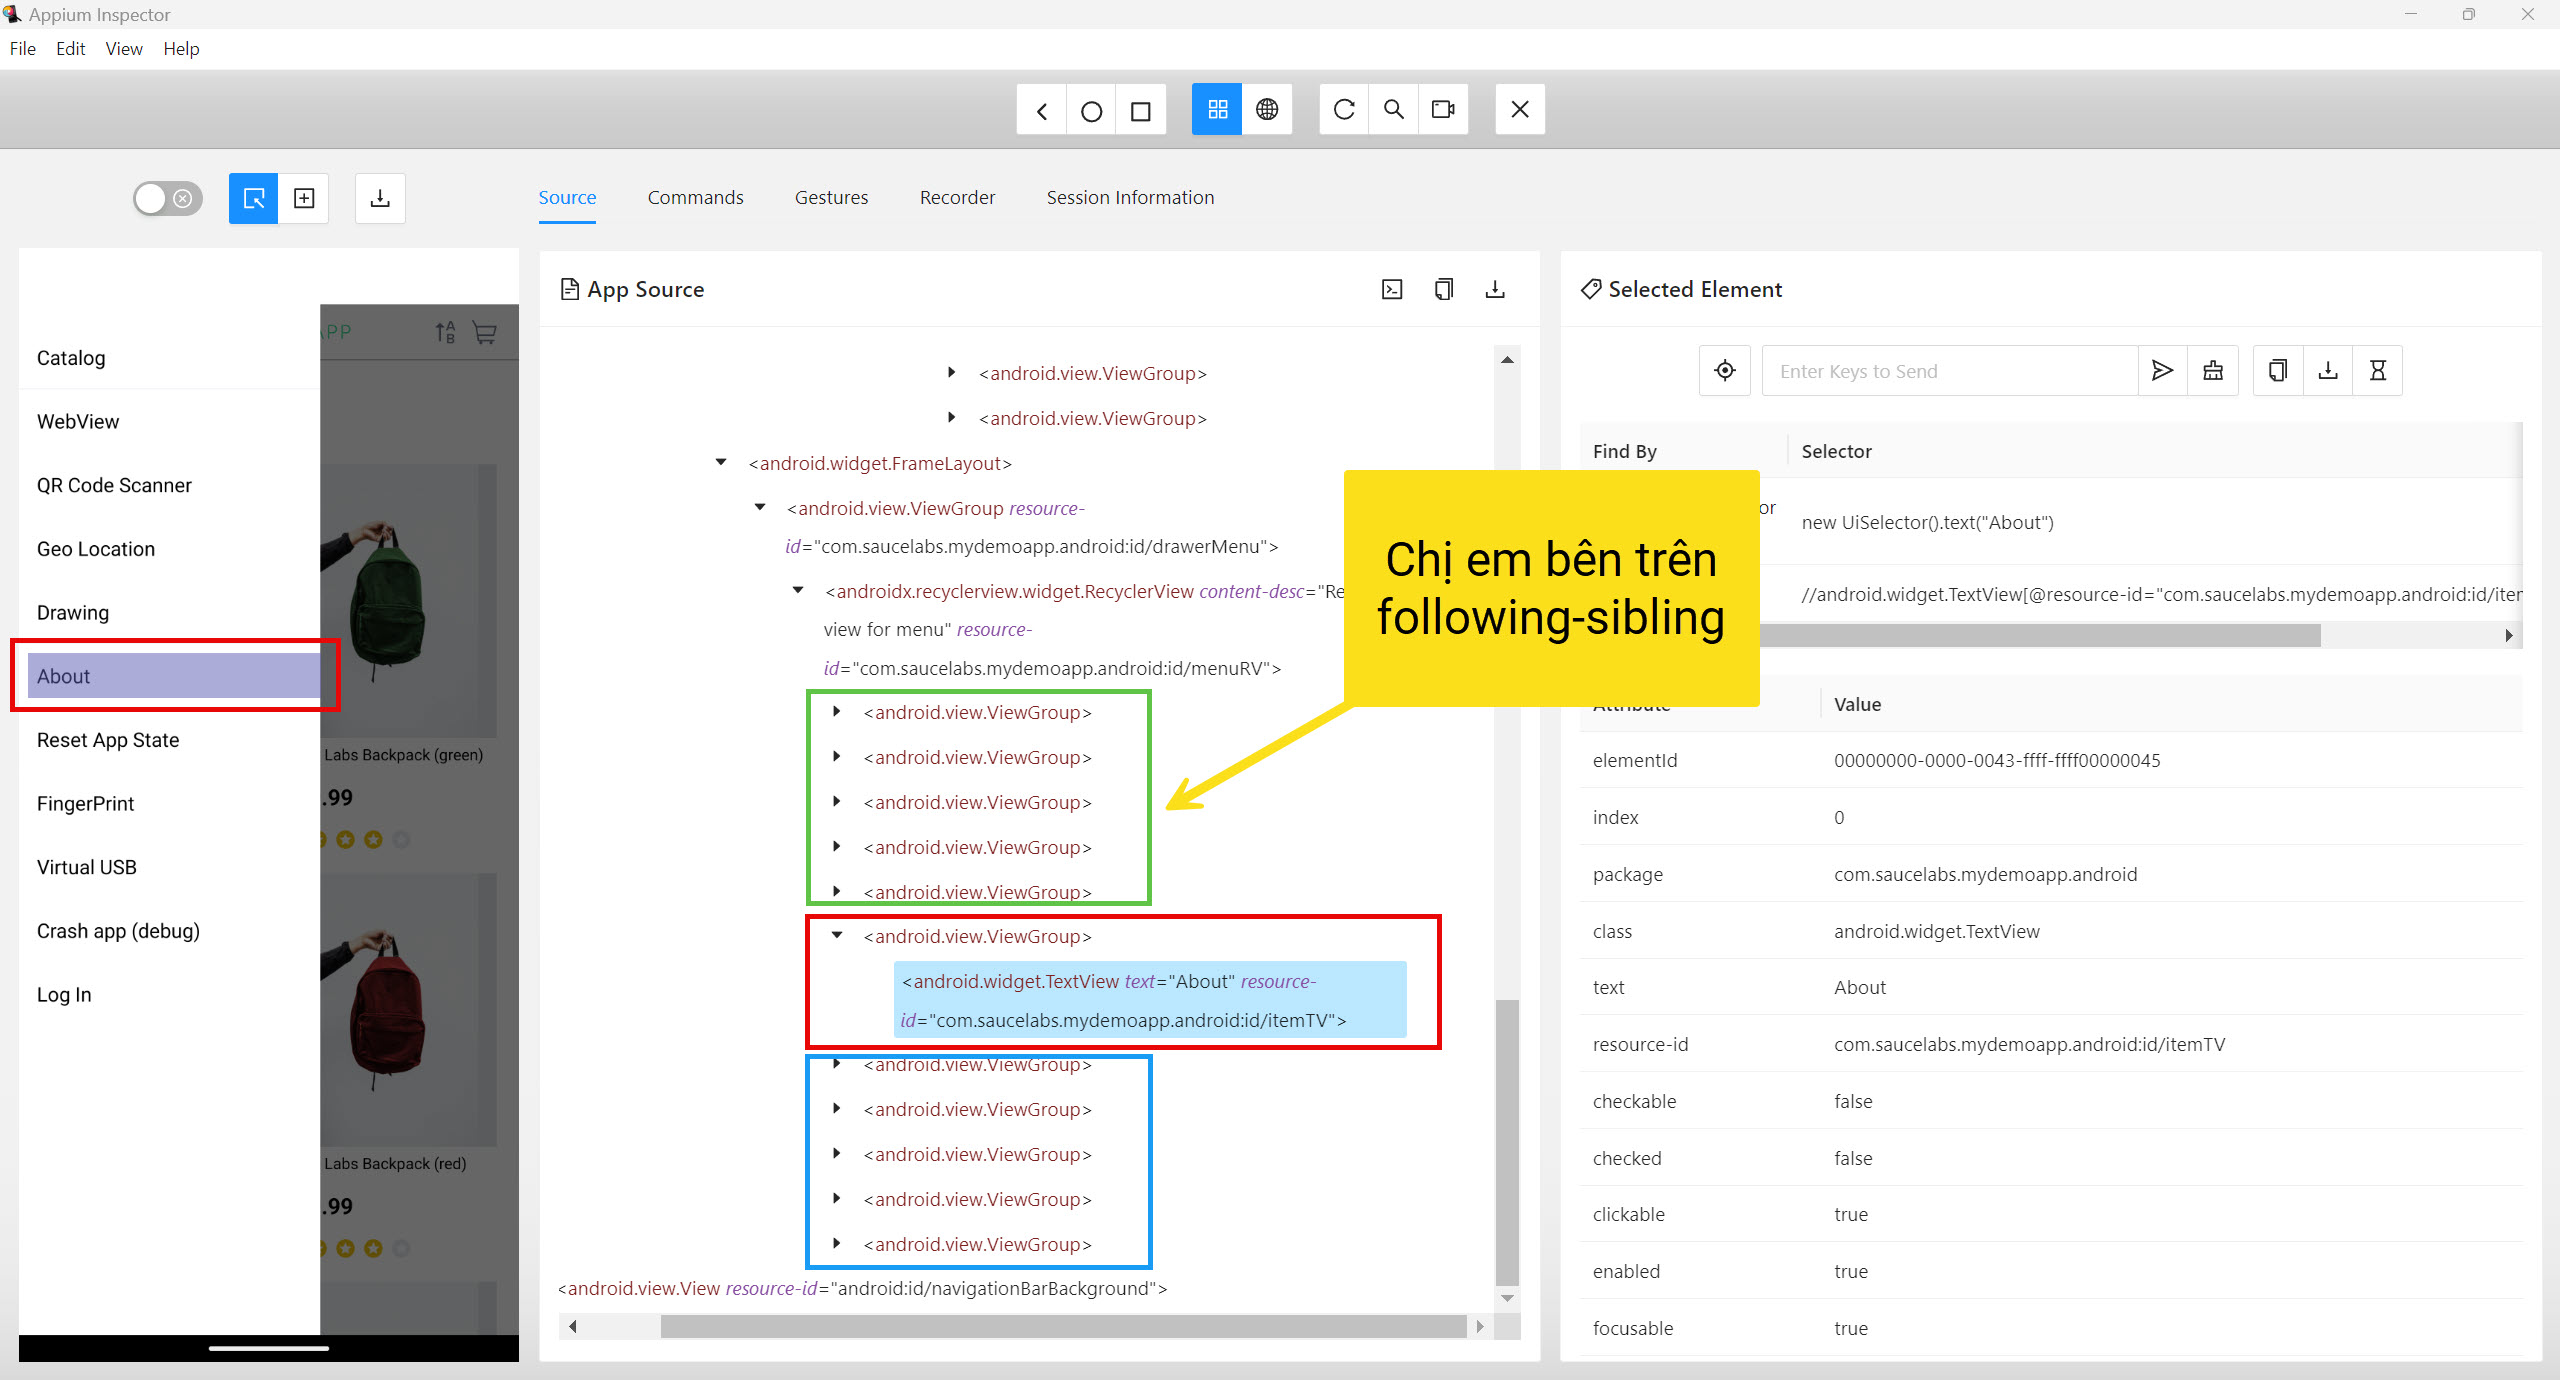
9. Chọn phần tử anh chị em nằm phía bên dưới (following-sibling::)
Tìm tất cả các nút anh chị em nằm sau Item 1:
List<WebElement> followingSiblings = driver.findElement(By.xpath("//android.widget.TextView[@text='Item 1']/following-sibling::android.widget.TextView"));

for (WebElement sibling : followingSiblings) {
    System.out.println("Following sibling: " + sibling.getAttribute("text"));
}
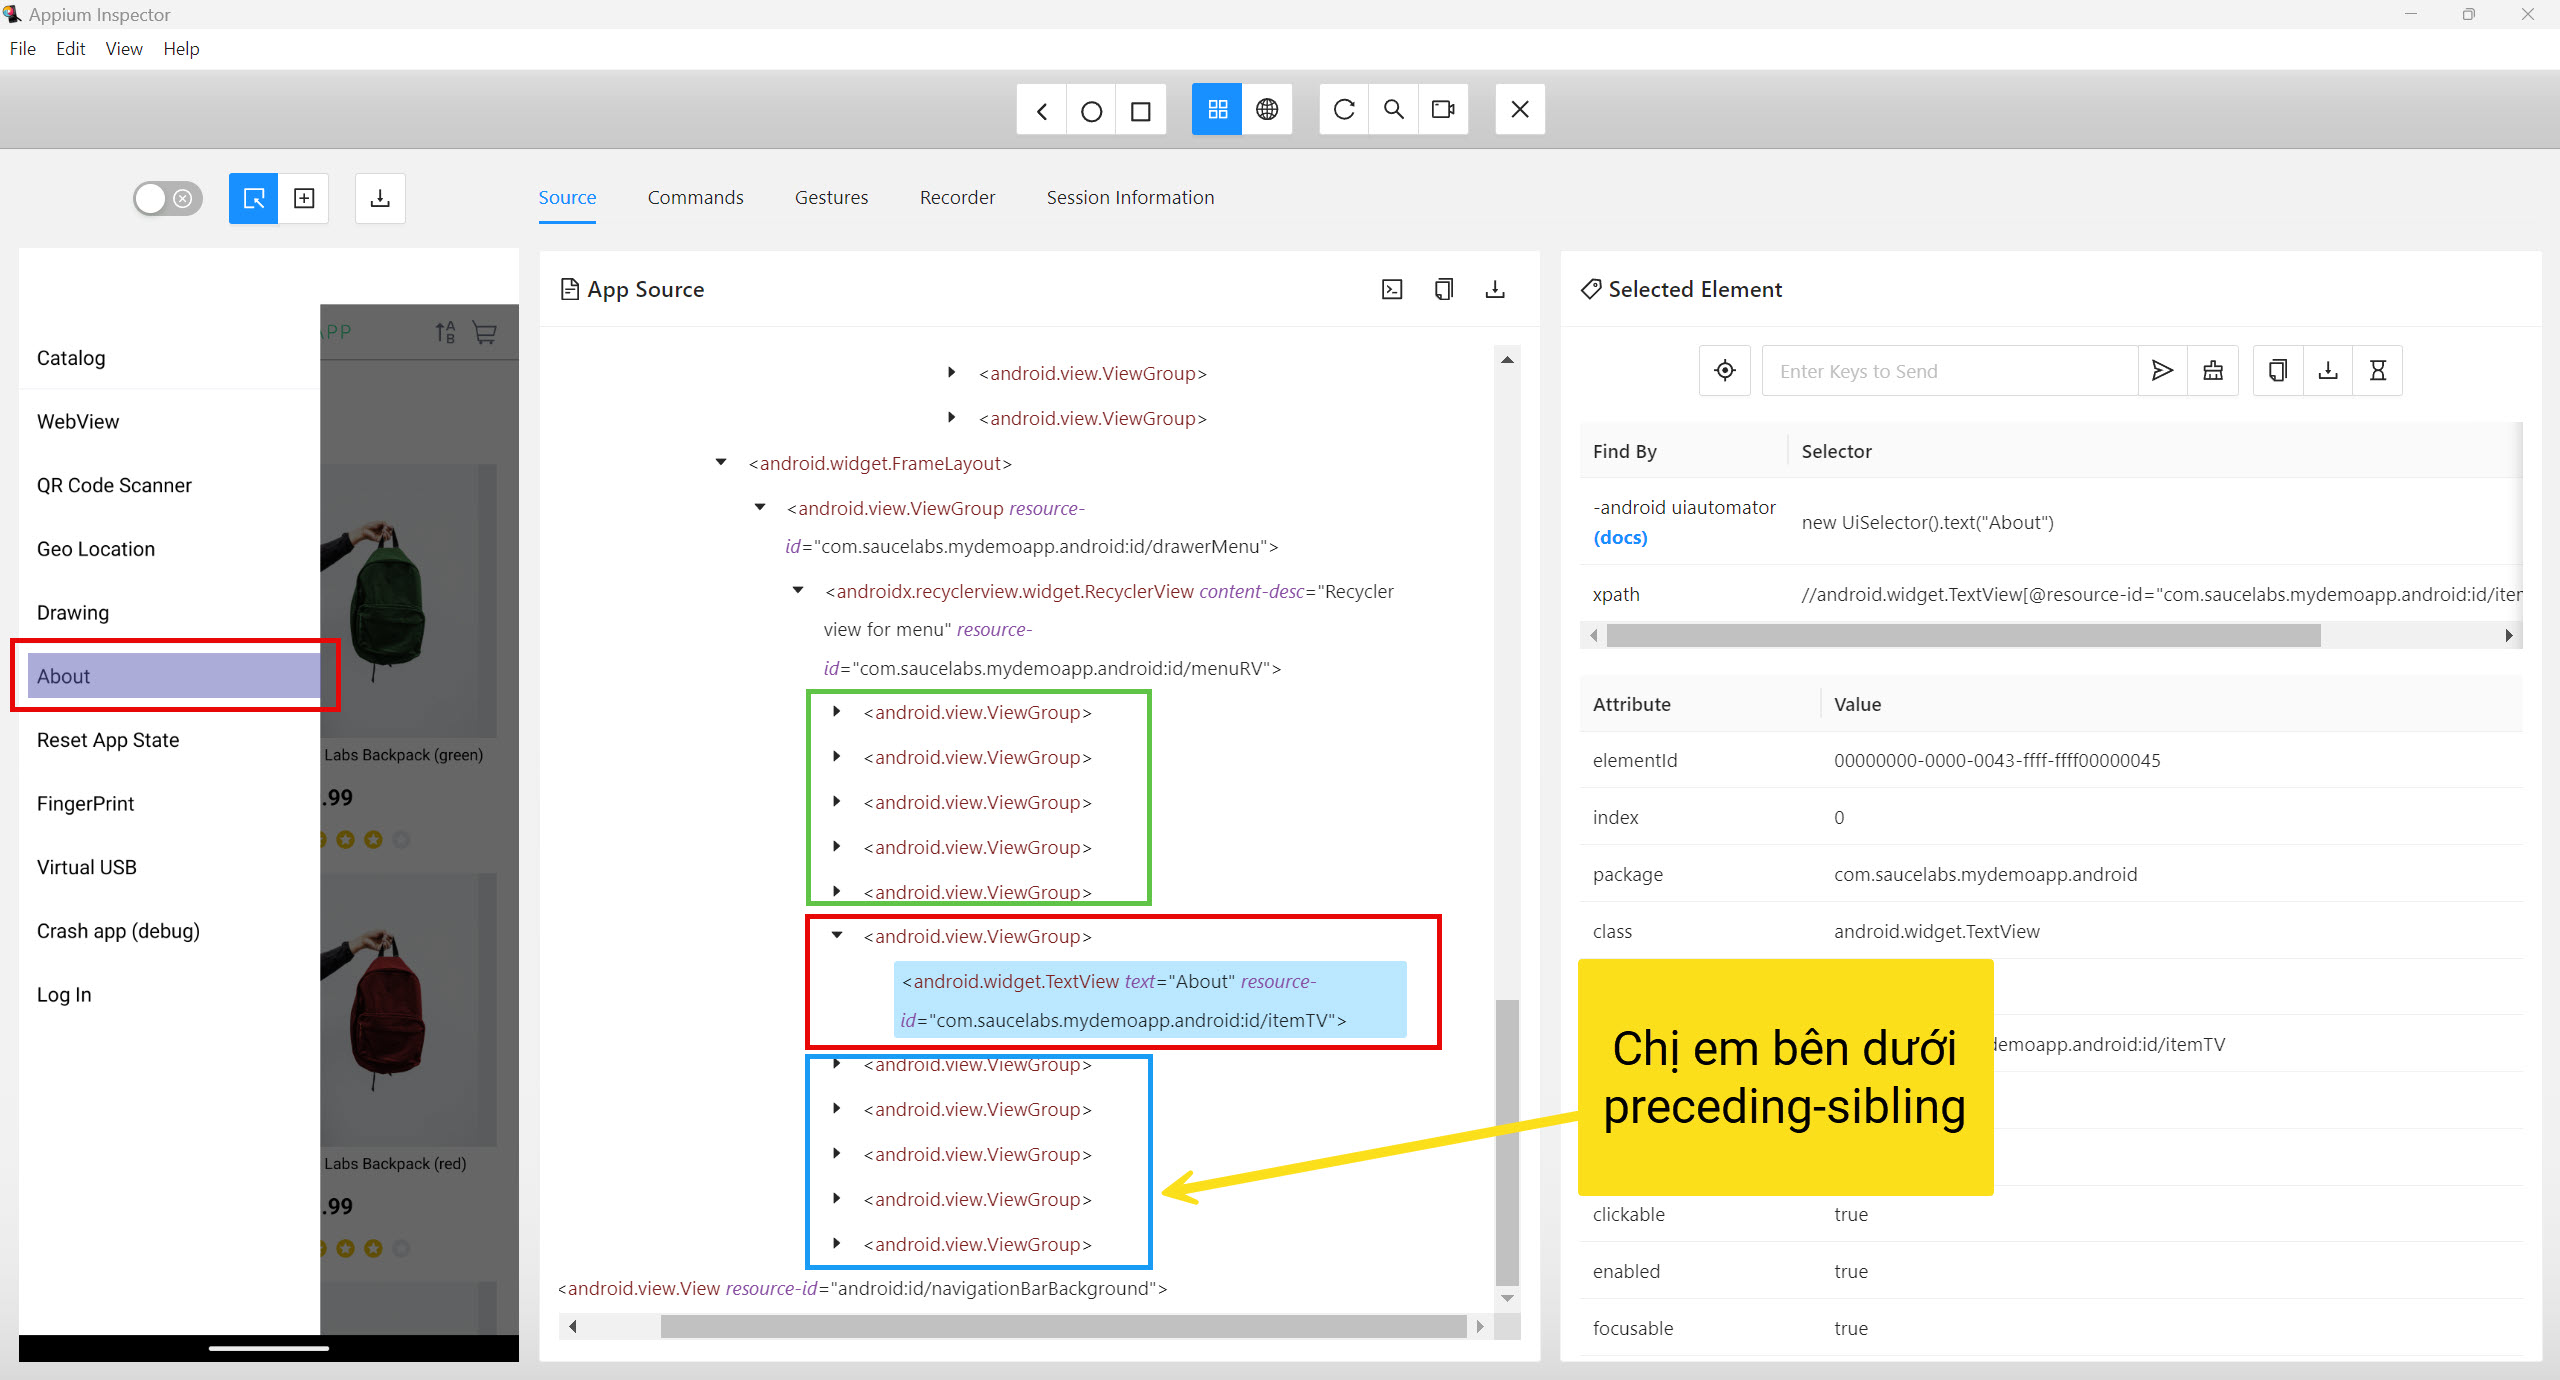
10. Chọn phần tử anh chị em nằm phía bên trên (preceding-sibling::)
Tìm tất cả các nút anh chị em nằm trước Item 3:
List<WebElement> precedingSiblings = driver.findElement(By.xpath("//android.widget.TextView[@text='Item 3']/preceding-sibling::android.widget.TextView"));

for (WebElement sibling : precedingSiblings) {
    System.out.println("Preceding sibling: " + sibling.getAttribute("text"));
}
11. Chọn phần tử nằm phía bên trên (preceding::)
Tìm tất cả các nút nằm bên trên nút android.widget.Button:
//android.widget.Button/preceding::*
Lưu ý: Có thể các bạn gặp lỗi không tìm được element do cú pháp tìm kiếm trả ra phức tạp, cần add thuộc tính vào Appium Inspector trước khi start session.
An unknown server-side error occurred while processing the command. Original error: java.util.ArrayList$ListItr cannot be cast to org.eclipse.wst.xml.xpath2.processor.internal.types.NodeType. Try changing the 'enforceXPath1' driver setting to 'true' in order to workaround the problem.
Add thuộc tính sau vào Appium Inspector:
"appium:enforceXPath1": true{
"platformName": "Android",
"appium:deviceName": "Pixel_8_Pro_API_35",
"appium:automationName": "UiAutomator2",
"appium:platformVersion": "15",
"appium:enforceXPath1": true
}12. Chọn phần tử nằm phía bên dưới (following::)
Tìm tất cả các nút nằm bên dưới nút android.widget.TextView:
//android.widget.TextView/following::*
Ngoài ra các bạn nghiên cứu thêm trên các model AI Chatbox như ChatGPT, Claude, Deepseek,... để biết thêm các dạng tìm kiếm khác.