![[Appium Java] Bài 6 - Cài đặt Maven và TestNG Framework chạy code Appium với java-client](/uploads/course/banner_course_appium_java_online_anh_tester.jpg)
NỘI DUNG BÀI HỌC
✅ Cài đặt IntelliJ IDEA để viết code auto test Java
✅ Cài đặt thư viện TestNG Framework và java-client vào Maven project trên IntelliJ IDEA
✅ Chạy code auto test đầu tiên với Appium Java
✅ Cài đặt môi trường Maven cho MacOS
✅ Cài đặt môi trường Maven cho Window
🔆 Điều kiện cần
Để cài đặt và sử dụng Maven, trước tiên chúng ta cần đảm bảo máy tính đã cài sẵn JDK và đã cấu hình biến môi trường JAVA_HOME.
Điền tên biến vào biến path thì nó mới hiểu và áp dụng được.
🔆 Tải Apache Maven
Apache Maven được tải miễn phí, các bạn có thể vào trang chủ của Apache Maven để tải xuống file zip. Chọn cái Binary zip archive.
https://maven.apache.org/download.cgi
Trong hướng dẫn bài viết là phiên bản 3.8.6 nhưng hiện tại mới nhất thì bản 3.9.9 đang là phiên bản mới nhất của Maven. Chúng ta nên dùng bản mới nhất.
Sau khi tải xong, các bạn tiến hành giải nén và đặt nó trong thư mục bất kỳ, nhưng hãy đặt trong thư mục ít đụng tới vì nếu lở các bạn xoá thì Maven sẽ không hoạt động được nữa. Sau khi giải nén thư mục sẽ trông giống như thế này.![[Selenium Java] Bài 4: Cài đặt môi trường Selenium với Java | Anh Tester](/uploads/lesson/selenium_java/giai_nen_maven_zip.jpg)
Bây giờ chúng ta move nó sang ổ đĩa C:\ cho an toàn vì cũng ít đụng đến. An suggest thôi nhé.![[Selenium Java] Bài 4: Cài đặt môi trường Selenium với Java | Anh Tester](/uploads/lesson/selenium_java/move_maven_to_c_disk.jpg)
🔆 Cài đặt biến môi trường cho Maven
Bước cuối cùng để chúng ta có thể sử dụng Maven là cài biến môi trường cho nó.
Vào thanh tìm kiếm của windows gõ View advanced system settings hoặc Variable nó sẽ ra như bên dưới:
![[Selenium Java] Bài 4: Cài đặt môi trường Selenium với Java | Anh Tester](/uploads/lesson/selenium_java/maven/variable.png)
Trong System Properties dialog, chọn vào Advanced và chọn Environment Variables…![[Selenium Java] Bài 4: Cài đặt môi trường Selenium với Java | Anh Tester](/uploads/lesson/selenium_java/maven/environment_variables.png)
Hoặc search từ khoá "Edit the system environment variables" nó nhảy thẳng vào tab System Properties luôn.
Tiếp theo, trong Environment variables dialog, vào phần System variables chọn New. Trong này chúng ta sẽ tạo biến môi trường MAVEN_HOME và trỏ đến thư mục mà chúng ta đã lưu trước đó. Y như JDK chúng ta từng làm.![[Selenium Java] Bài 4: Cài đặt môi trường Selenium với Java | Anh Tester](/uploads/lesson/selenium_java/maven/set_maven_home.jpg)
Nó sẽ như thế này![[Selenium Java] Bài 4: Cài đặt môi trường Selenium với Java | Anh Tester](/uploads/lesson/selenium_java/maven/set_maven_home_done.jpg)
Tiếp theo chúng ta sẽ trỏ cái biến MAVEN_HOME này vào biến Path của hệ thống![[Selenium Java] Bài 4: Cài đặt môi trường Selenium với Java | Anh Tester](/uploads/lesson/selenium_java/maven/edit_path.jpg)
Sau khi nhấn Edit thì sẽ hiện form tiếp tục nhấn New![[Selenium Java] Bài 4: Cài đặt môi trường Selenium với Java | Anh Tester](/uploads/lesson/selenium_java/maven/add_new_in_path.jpg)
Chúng ta nhập giá trị như sau: %MAVEN_HOME%\bin![[Selenium Java] Bài 4: Cài đặt môi trường Selenium với Java | Anh Tester](/uploads/lesson/selenium_java/maven/set_value_on_path.jpg)
Nghĩa là chúng ta chỉ định từ biến MAVEN_HOME trỏ đến thư mục bin của nó
Tiếp theo nhấn Ok Ok Ok là xong.
🔆 Kiểm tra phiên bản Maven đã cài đặt
Để kiểm tra quá trình cài đặt đã thành công hay chưa chúng ta cần mở CMD (Command Prompt) lên và chạy những lệnh sau:mvn -version
![[Selenium Java] Bài 4: Cài đặt môi trường Selenium với Java | Anh Tester](/uploads/lesson/selenium_java/maven/cmd_check_mvn.jpg)
Nó sẽ hiển thị Maven version chúng ta vừa cài và cùng phiên bản JDK đã cài trước đó. Vậy là xong !!
Nếu các bạn check nó chưa ra thì mở Command Prompt ghi lệnh này thử nó có ra đường dẫn đúng chưa:echo %MAVEN_HOME%
Khi nó chưa hiện đường dẫn hoặc đã hiện đường dẫn rồi mà chưa hiểu biến môi trường thì chúng ta cần Restart máy lại 😁
✅ Cài đặt IntelliJ IDEA để viết code auto test Java
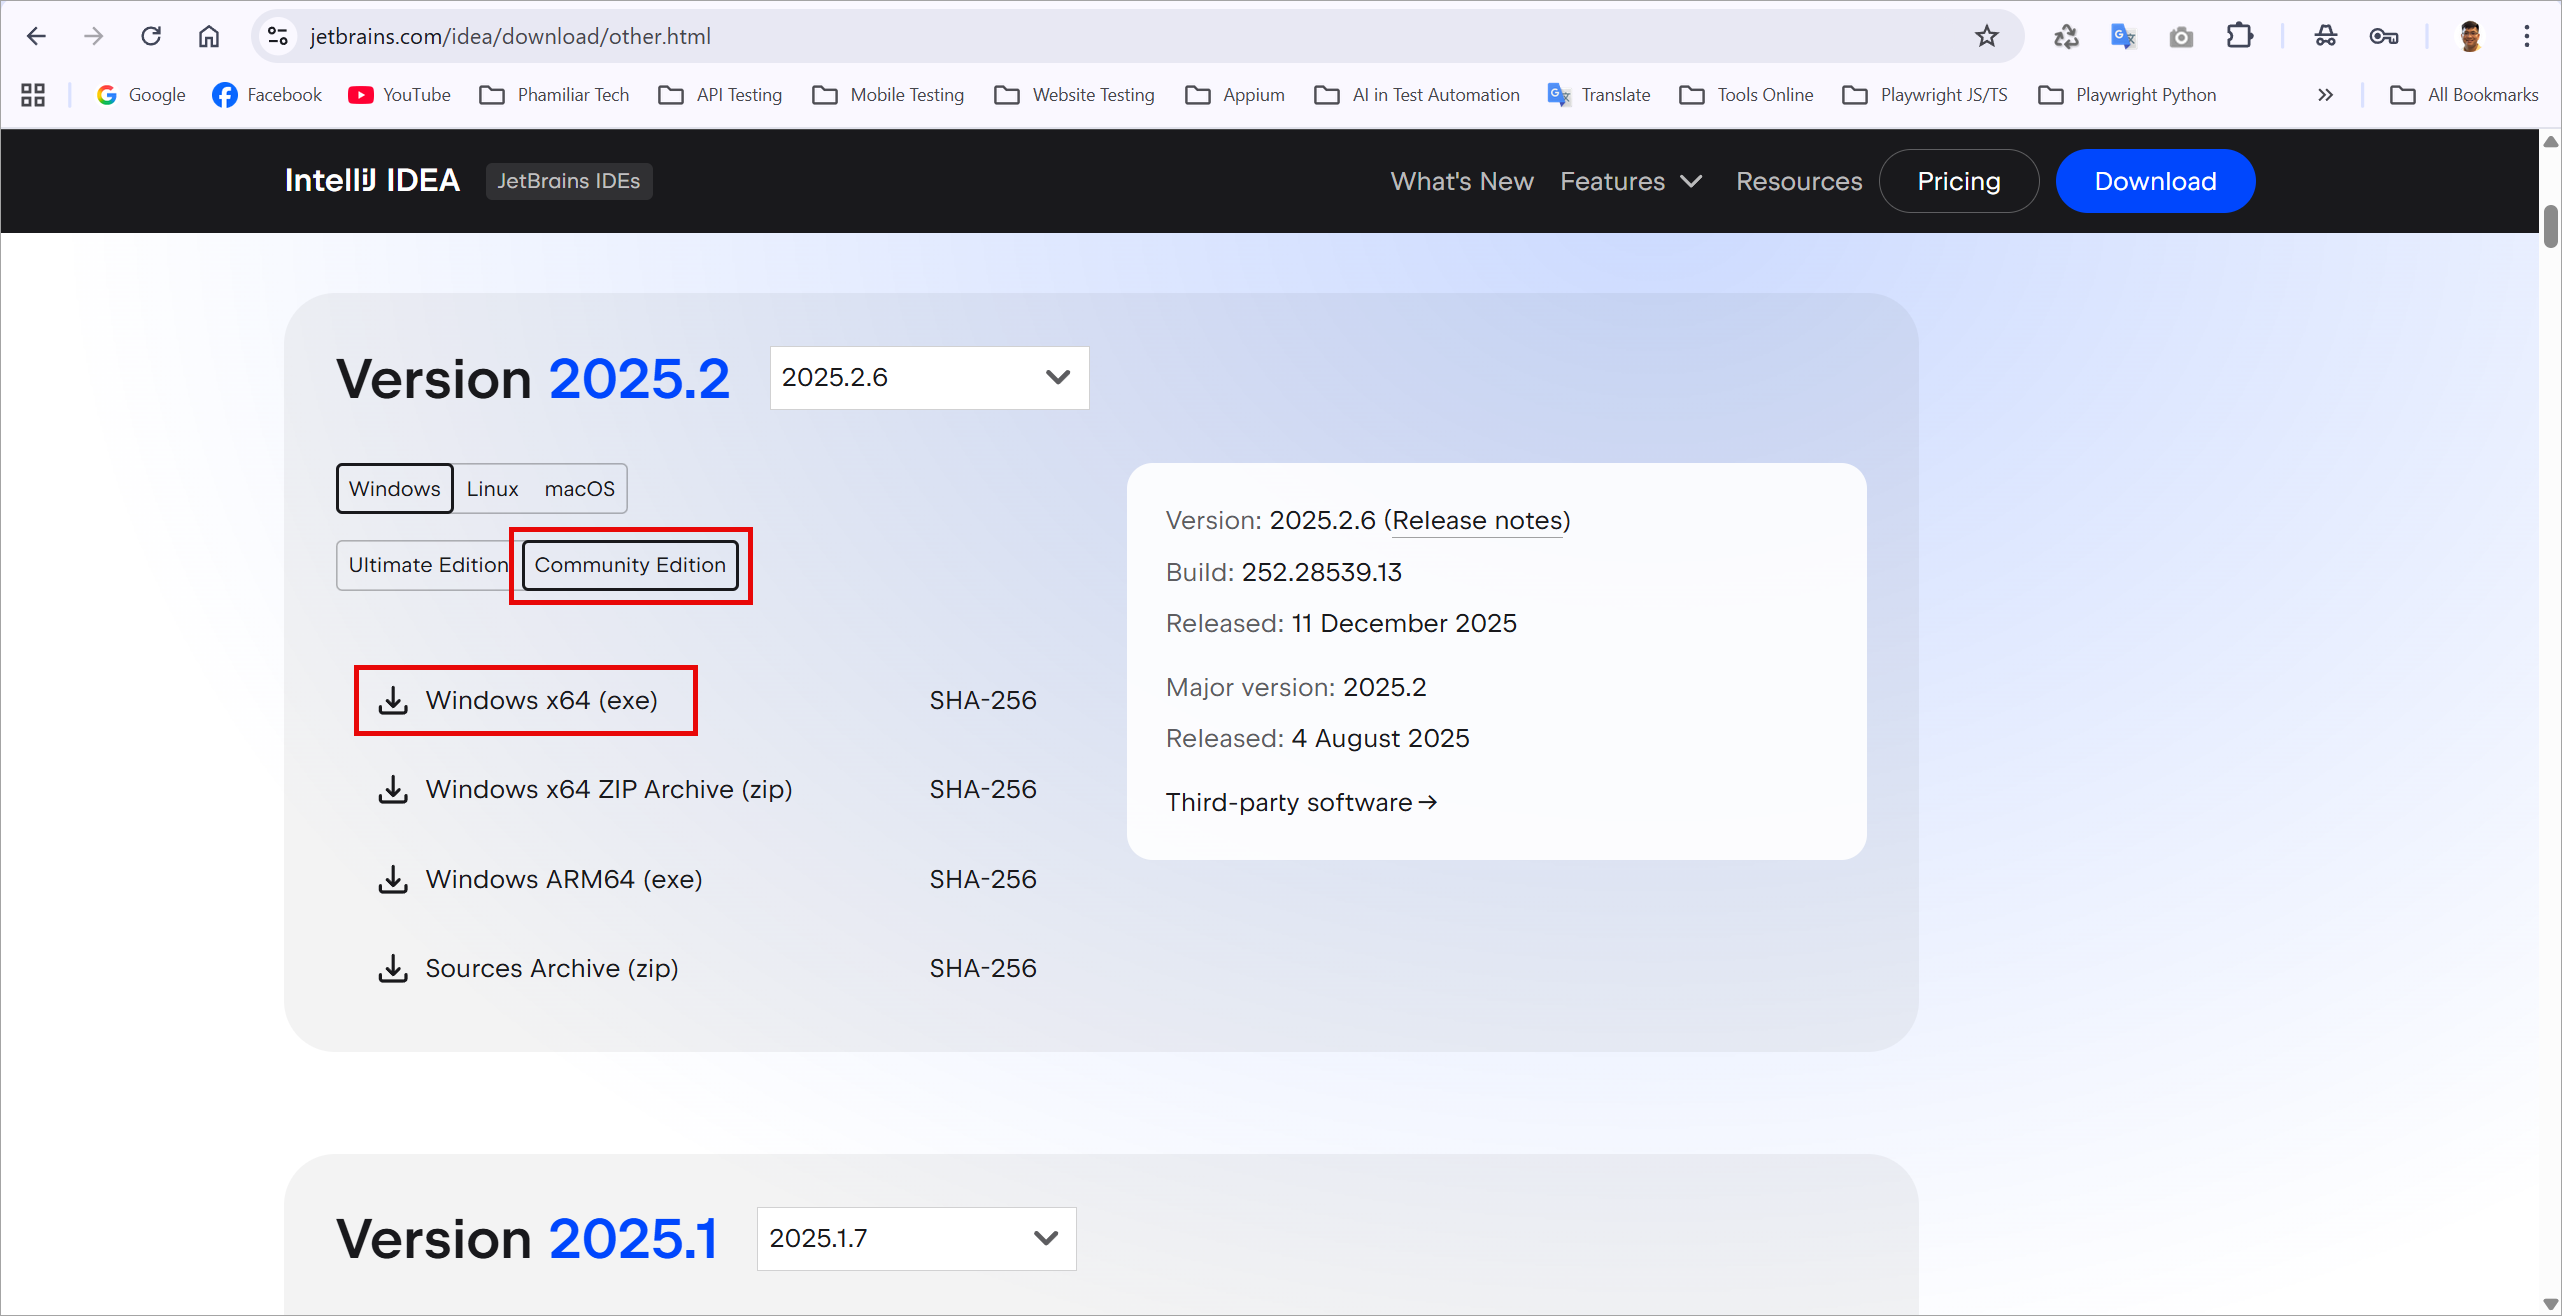
Bước 1: Truy cập https://www.jetbrains.com/idea/download để download file cài đặt IntelliJ IDEA Community. Chọn bản Community nhé. Không tải bản Ultimate.
Chọn Other versions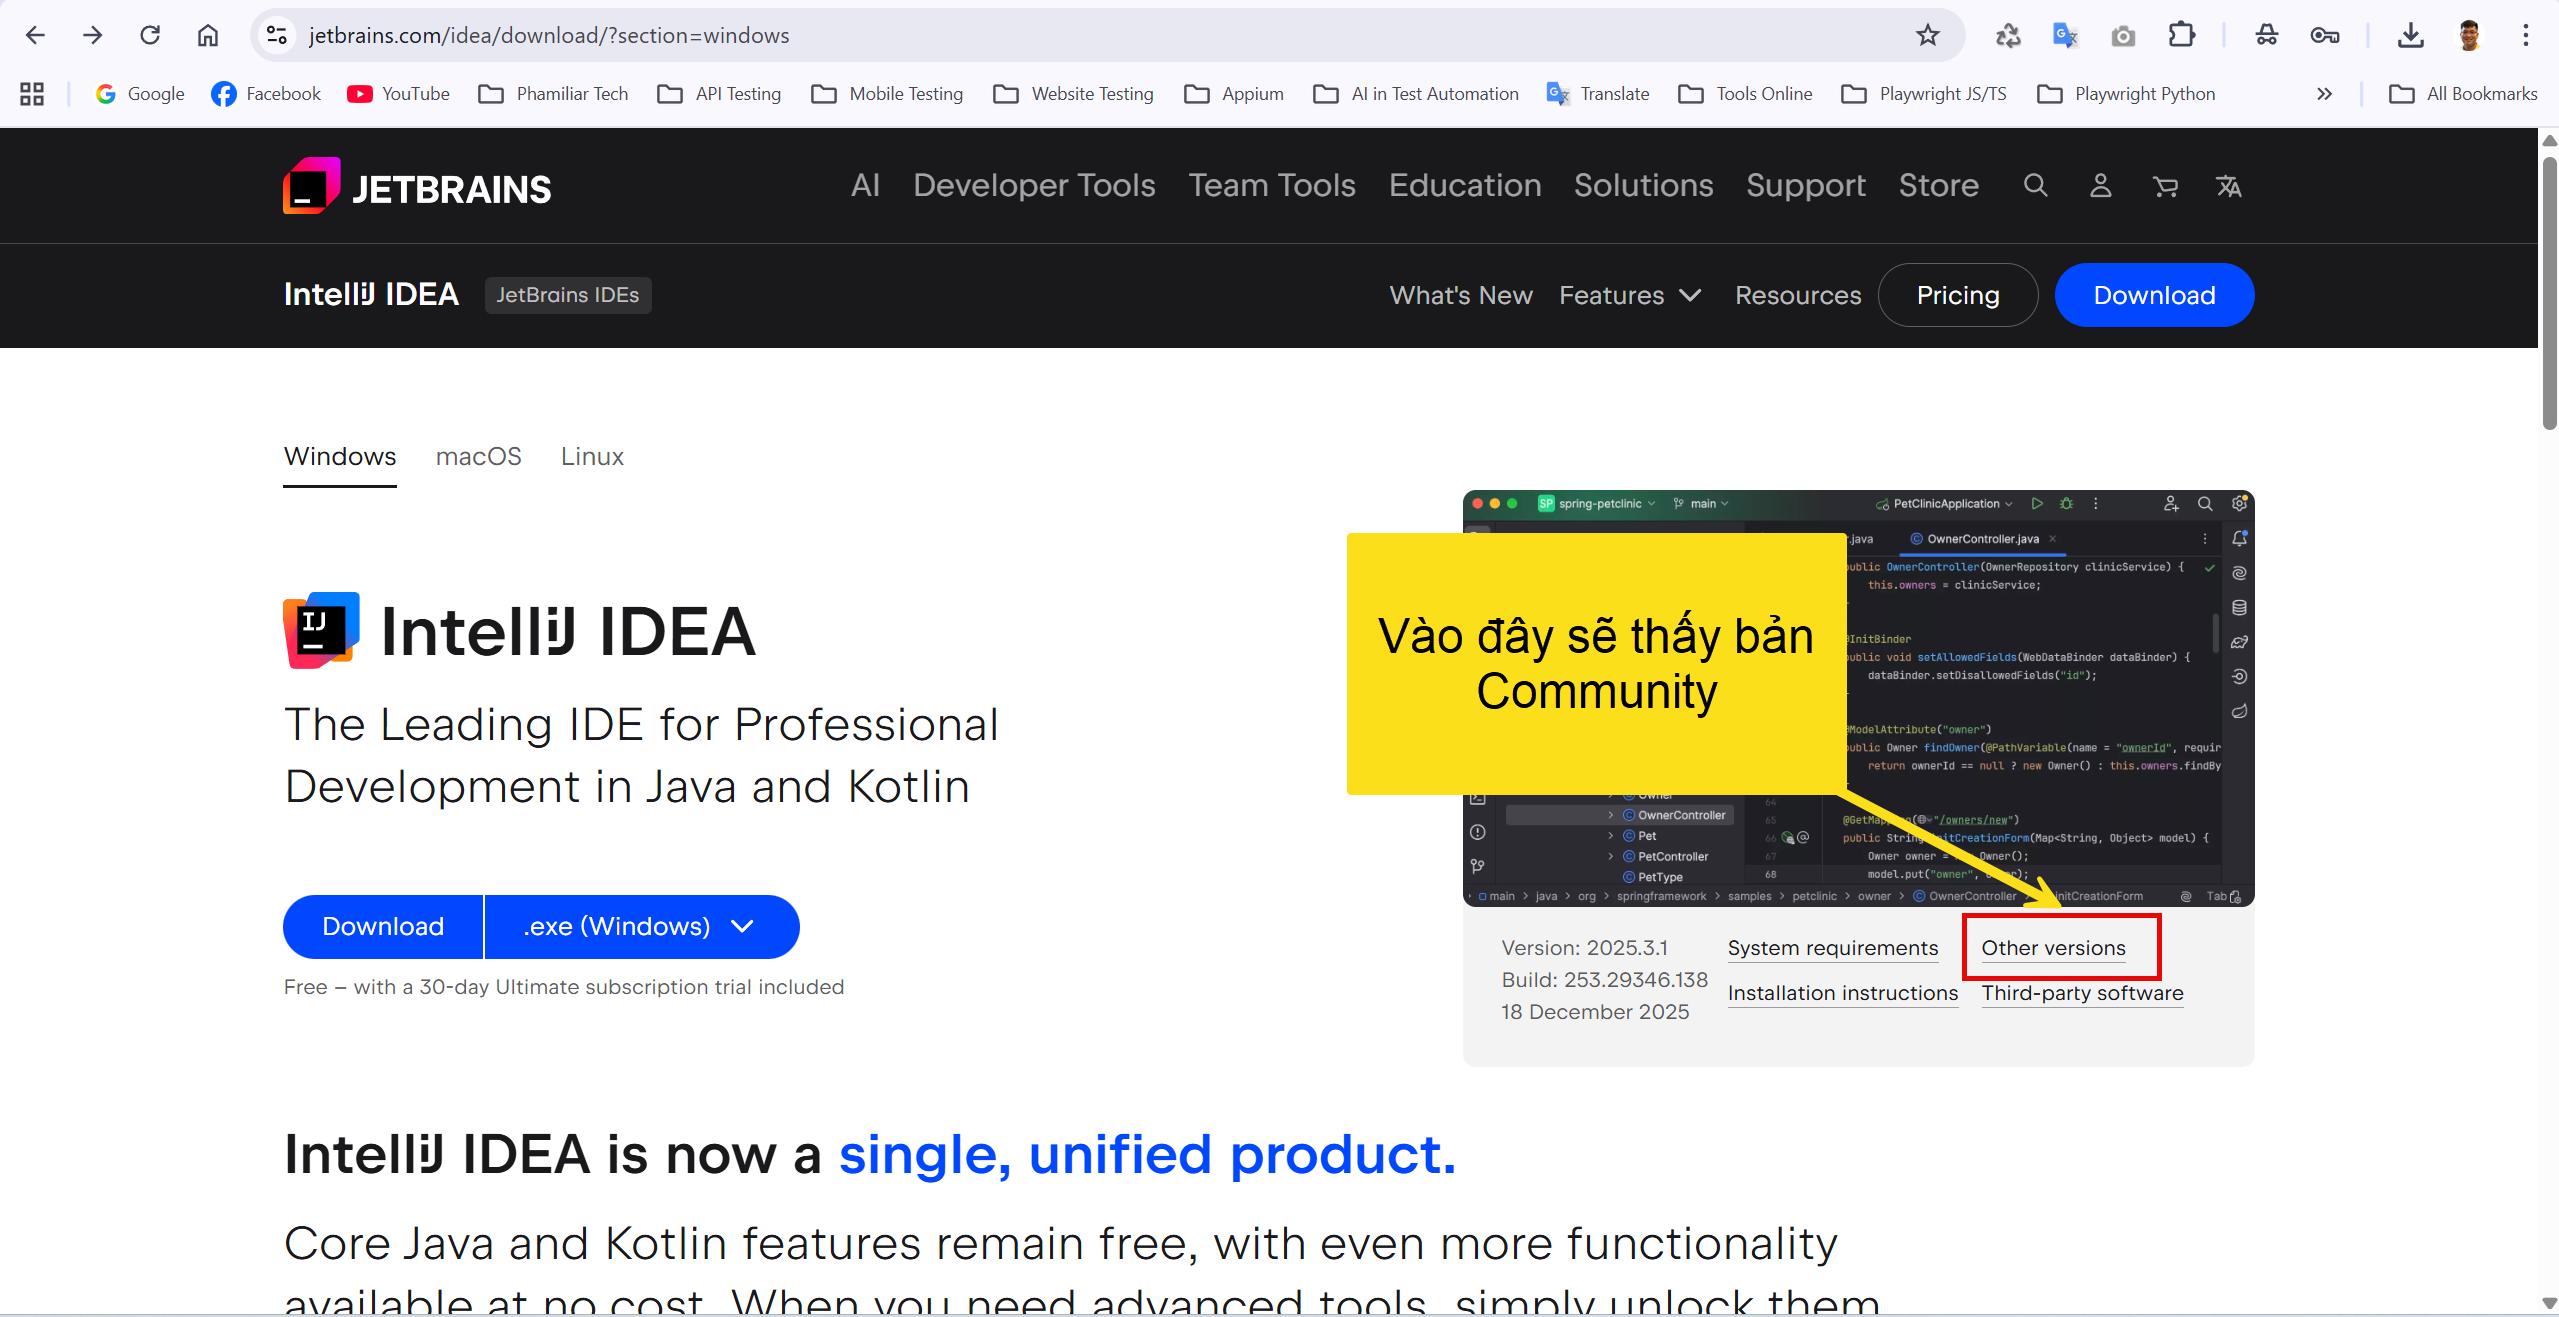
Đối với MacOS thì chọn như này: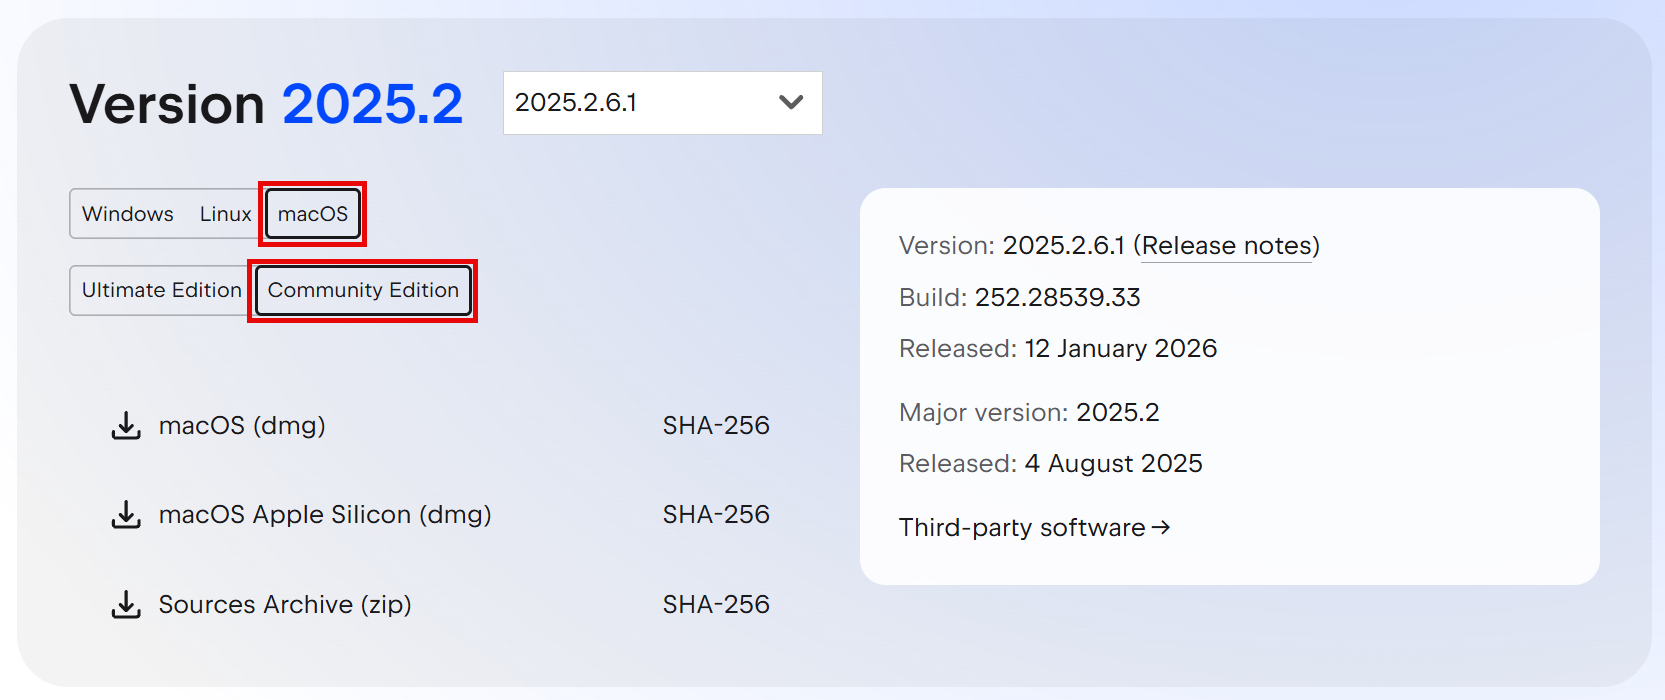
Bước 2: Chạy file đã tải về và cứ nhấn Next, cho đến khi gặp màn hình này thì chú ý chọn như mẫu:
✅ Tạo Maven project trên IntelliJ IDEA
Bước 1: Mở IntelliJ IDEA và chọn File > New > Project
Bước 2: Tại tab New Project chọn Java và nhập thông tin như mẫu:e
Nhấn Create để tạo project Maven.
✅ Cài đặt thư viện TestNG Framework và java-client vào Maven project
✳️ Giới thiệu TestNG Framework
TestNG là một framework kiểm thử tự động được viết bằng Java, có chức năng quản lý việc tạo test case, thứ tự chạy test case và report sau khi test.
TestNG được xây dựng từ cảm hứng của 2 Framework là JUnit (Java) và NUnit (C#). NG là viết tắt của từ Next Generation.
Xem mindmap để có cái nhìn tổng quan hơn về testNG![[Selenium Java] Lesson 9: Cài đặt và sử dụng TestNG | Anh Tester](https://images.viblo.asia/2ecb2d6f-2849-4fbd-ac79-10c81c7b5bb0.png)
🔆Các tính năng nổi bật của TestNG Framework
-
Hỗ trợ cho các loại kiểm thử khác nhau:
- Kiểm thử đơn vị (Unit Testing).
- Kiểm thử tích hợp (Integration Testing).
- Kiểm thử chức năng (Functional Testing).
- Kiểm thử đầu cuối (End-to-End Testing).
- TestNG cung cấp các annotation phong phú hơn JUnit, giúp việc cấu hình và tổ chức các bài kiểm thử trở nên dễ dàng hơn.
- Hỗ trợ dữ liệu kiểm thử sử dụng annotation
@DataProvider. Có thể dễ dàng chạy một bài kiểm thử với nhiều bộ dữ liệu khác nhau. - Cấu hình suite kiểm thử và trình tự chạy các bài kiểm thử thông qua file
testng.xml, cho phép điều chỉnh thứ tự chạy, gán thuộc tính, và thiết lập môi trường. - Chạy các bài kiểm thử song song trên nhiều luồng (threads) hoặc nhiều trình duyệt (khi tích hợp với Selenium). Cấu hình thông qua file
testng.xml. - Cung cấp các chỉ dẫn Annotation để nhận diện phương thức test.
- Tổ chức các bài kiểm thử thành các nhóm sử dụng annotation
groups. Cho phép chạy hoặc bỏ qua các nhóm kiểm thử cụ thể. - TestNG không yêu cầu có phương thức main() trong Java.
- Tự động tạo báo cáo HTML/XML sau khi chạy. Báo cáo chi tiết về số bài kiểm thử thành công, thất bại, và bị bỏ qua.
- Dễ dàng mở rộng bằng cách viết các listener, reporter, và các lớp hook khác.
- Kiểm soát và kiểm tra các trường hợp ngoại lệ bằng thuộc tính
Exceptionsriêng.
✳️ Cài đặt và sử dụng TestNG Framework với Maven project
🔆 Cài đặt TestNG Framework
Các bạn chỉ cần add thư viện TestNG vào trong file pom.xml và build lại Maven.
Tải TestNG trên MVN repository: https://mvnrepository.com/artifact/org.testng/testng
Ở đây chúng ta sẽ dùng bản mới nhất:
<!-- https://mvnrepository.com/artifact/org.testng/testng -->
<dependency>
    <groupId>org.testng</groupId>
    <artifactId>testng</artifactId>
    <version>7.10.2</version>
</dependency>
Các bạn chú ý là bỏ cái dòng <scope>test</scope> ra nhé. Nghĩa là mình sẽ cho framework áp dụng trên toàn project chứ không chỉ riêng vùng package test. Nôm na là nó sẽ áp dụng cho cả 2 package main và test.
Tiếp theo là thêm TestNG Framework vào pom.xml và nhớ nhấn reload lại maven project.
Lưu ý: tất cả các thư viện khi add vào pom.xml phải đặt trong cặp thẻ <dependencies></dependencies>
🔆 Cài đặt thư viện java-client
Các bạn chỉ cần tiếp tục add thư viện java-client vào trong file pom.xml và build lại Maven là được.
Tải java-client trên MVN repository: https://mvnrepository.com/artifact/io.appium/java-client
<!-- https://mvnrepository.com/artifact/io.appium/java-client -->
<dependency>
    <groupId>io.appium</groupId>
    <artifactId>java-client</artifactId>
    <version>9.3.0</version>
</dependency>
Các bạn copy phần thư viện thuộc maven xong dán vào trong phần thẻ <dependencies> nhớ nhấn reload maven.
✅ Chạy code auto test đầu tiên với Appium Java
Tạo các package tuỳ ý để sắp xếp và lưu trữ các class Java.
⭐️ Tạo class SystemHelpers
Dùng để khai báo các hàm hỗ trợ xử lý liên quan đến hệ thống máy tính dùng code thuần Java.
Thiết lập bên package main của project Maven. Tạo package con helpers để lưu vào cho rõ ràng.
package com.anhtester.helpers;

import java.io.BufferedReader;
import java.io.File;
import java.io.IOException;
import java.io.InputStreamReader;
import java.text.Normalizer;
import java.util.ArrayList;
import java.util.List;
import java.util.Locale;
import java.util.regex.Pattern;

public class SystemHelpers {

    private static final Pattern NONLATIN = Pattern.compile("[^\\w-]");
    private static final Pattern WHITESPACE = Pattern.compile("[\\s]");

    public static String makeSlug(String input) {
        if (input == null)
            throw new IllegalArgumentException();

        String noWhiteSpace = WHITESPACE.matcher(input).replaceAll("_");
        String normalized = Normalizer.normalize(noWhiteSpace, Normalizer.Form.NFD);
        String slug = NONLATIN.matcher(normalized).replaceAll("");
        return slug.toLowerCase(Locale.ENGLISH);
    }

    /**
     * @return Get the path to your source directory with a / at the end
     */
    public static String getCurrentDir() {
        String current = System.getProperty("user.dir") + File.separator;
        return current;
    }

    /**
     * Create folder empty
     *
     * @param path path to create folder
     */
    public static void createFolder(String path) {
        // File is a class inside java.io package
        File file = new File(path);

        String result = null;

        int lengthSum = path.length();
        int lengthSub = path.substring(0, path.lastIndexOf('/')).length();

        result = path.substring(lengthSub, lengthSum);

        if (!file.exists()) {
            file.mkdir();  // mkdir is used to create folder
            System.out.println("Folder " + file.getName() + " created: " + path);
        } else {
            System.out.println("Folder already created");
        }
    }

    /**
     * @param str        string to be split based on condition
     * @param valueSplit the character to split the string into an array of values
     * @return array of string values after splitting
     */
    public static ArrayList<String> splitString(String str, String valueSplit) {
        ArrayList<String> arrayListString = new ArrayList<>();
        for (String s : str.split(valueSplit, 0)) {
            arrayListString.add(s);
        }
        return arrayListString;
    }

    public static boolean checkValueInListString(String expected, String listValues[]) {
        boolean found = false;

        for (String s : listValues) {
            if (s.equals(expected)) {
                found = true;
                break;
            }
        }
        return found;
    }

    public static boolean checkValueInListString(String expected, List<String> listValues) {
        boolean found = false;

        for (String s : listValues) {
            if (s.equals(expected)) {
                found = true;
                break;
            }
        }
        return found;
    }

    public static void killProcessOnPort(String port) {
        String command = "";

        // Check OS to set command to find and kill process
        if (System.getProperty("os.name").toLowerCase().contains("win")) {
            command = "cmd /c netstat -ano | findstr :" + port;
        } else {
            command = "lsof -i :" + port;
        }

        try {
            Process process = Runtime.getRuntime().exec(command);
            BufferedReader reader = new BufferedReader(new InputStreamReader(process.getInputStream()));
            String line;
            while ((line = reader.readLine()) != null) {
                String[] tokens = line.trim().split("\\s+");
                String pid = tokens[1];  // PID position may vary by OS
                if (System.getProperty("os.name").toLowerCase().contains("win")) {
                    Runtime.getRuntime().exec("taskkill /F /PID " + pid);
                } else {
                    Runtime.getRuntime().exec("kill -9 " + pid);
                }
            }
            reader.close();
            process.waitFor();
            System.out.println("####### Kill process on port " + port + " successfully.");
        } catch (IOException | InterruptedException e) {
            e.printStackTrace();
        }
    }

    public static void startAppiumWithPlugins(String server, String port) {
        ProcessBuilder processBuilder = new ProcessBuilder(
                "appium",
                "-a", server,
                "-p", port,
                "-ka", "800",
                "--use-plugins", "appium-reporter-plugin,element-wait,gestures,device-farm,appium-dashboard",
                "-pa", "/",
                "--plugin-device-farm-platform", "android"
        );

        // Redirect error and output streams
        processBuilder.redirectErrorStream(true);

        try {
            // Start the process
            Process process = processBuilder.start();
            System.out.println("Appium server started with plugins.");

            // Optional: Read the output (if needed for debugging)
            new Thread(() -> {
                try (BufferedReader reader = new BufferedReader(new InputStreamReader(process.getInputStream()))) {
                    String line;
                    while ((line = reader.readLine()) != null) {
                        System.out.println(line);
                    }
                } catch (IOException e) {
                    e.printStackTrace();
                }
            }).start();

        } catch (IOException e) {
            e.printStackTrace();
        }
    }

}
⭐️ Tạo class DriverManager
Dùng để khai báo driver Appium toàn cục có thể hỗ trợ đa luồng multi thread, sau này có thể chạy được test cases song song khi cần.
Thiết lập bên package main của project Maven. Tạo package con drivers để lưu vào cho rõ ràng.
Khai báo 1 lần dùng luôn không thay đổi, hoặc ít khi thay đổi.
package com.anhtester.drivers;

import io.appium.java_client.AppiumDriver;

public class DriverManager {
    private static ThreadLocal<AppiumDriver> driver = new ThreadLocal<>();

    public static void setDriver(AppiumDriver driverInstance) {
        driver.set(driverInstance);
    }

    public static AppiumDriver getDriver() {
        return driver.get();
    }

    public static void quitDriver() {
        if (driver.get() != null) {
            getDriver().quit();
            driver.remove();
        }
    }
}
Khi cần đến driver của Appium thì chỉ cần gọi tên class chấm tên hàm phù hợp. Ví dụ DriverManager.getDriver() để lấy giá trị driver toàn cục đã được khởi tạo tại class BaseTest.
⭐️ Tạo class BaseTest
Dùng để khởi tạo driver Appium, mở app mobile và thiết lập các thông số cho Appium server như plugins, host, port,...
Thiết lập bên package test của project Maven. Tạo package con common để lưu vào cho rõ ràng.
package com.anhtester.common;

import com.anhtester.drivers.DriverManager;
import com.anhtester.helpers.SystemHelpers;
import io.appium.java_client.AppiumDriver;
import io.appium.java_client.android.options.UiAutomator2Options;
import io.appium.java_client.service.local.AppiumDriverLocalService;
import io.appium.java_client.service.local.AppiumServiceBuilder;
import io.appium.java_client.service.local.flags.GeneralServerFlag;
import org.testng.annotations.AfterTest;
import org.testng.annotations.BeforeSuite;
import org.testng.annotations.BeforeTest;

import java.net.MalformedURLException;
import java.net.URL;
import java.time.Duration;

public class BaseTest {

    private AppiumDriverLocalService service;
    private String HOST = "127.0.0.1";
    private String PORT = "4723";
    private int TIMEOUT_SERVICE = 60;

    @BeforeSuite
    public void runAppiumServer() {
        //Kill process on port
        SystemHelpers.killProcessOnPort("");

        //Build the Appium service
        AppiumServiceBuilder builder = new AppiumServiceBuilder();
        builder.withIPAddress(HOST);
        builder.usingPort(Integer.parseInt(PORT));
        builder.withArgument(GeneralServerFlag.LOG_LEVEL, "info"); // Set log level (optional)
        builder.withTimeout(Duration.ofSeconds(TIMEOUT_SERVICE));

        //Start the server with the builder
        service = AppiumDriverLocalService.buildService(builder);
        service.start();

        if (service.isRunning()) {
            System.out.println("##### Appium server started on " + HOST + ":" + PORT);
        } else {
            System.out.println("Failed to start Appium server.");
        }

    }

    @BeforeTest
    public void setUpDriver() {
        AppiumDriver driver;
        UiAutomator2Options options = new UiAutomator2Options();

        System.out.println("***SERVER ADDRESS: " + HOST);
        System.out.println("***SERVER POST: " + PORT);

        options.setPlatformName("Android");
        options.setPlatformVersion("14");
        options.setAutomationName("UiAutomator2");
        options.setDeviceName("Pixel_9_Pro_XL_API_34");
        options.setAppPackage("com.anhtester.mobile_app.taurus");
        options.setAppActivity("com.anhtester.mobile_app.taurus.MainActivity");
        options.setNoReset(false);
        options.setFullReset(false);

        try {
            driver = new AppiumDriver(new URL("http://" + HOST + ":" + PORT), options);
            DriverManager.setDriver(driver);
        } catch (MalformedURLException e) {
            throw new RuntimeException(e);
        }

        driver.manage().timeouts().implicitlyWait(Duration.ofSeconds(10));

    }

    @AfterTest
    public void tearDownDriver() {
        if (DriverManager.getDriver() != null) {
            DriverManager.quitDriver();
        }
        if (service != null && service.isRunning()) {
            service.stop();
            System.out.println("##### Appium server stopped.");
        }
    }
}
Các thông số options dựa vào JSON hôm trước đã dùng Appium Inspector để kết nối.
Các ghi chú (Annotation) @BeforeSuite @BeforeTest và @AfterTest được hỗ trợ bởi TestNG Framework để setup việc thứ tự chạy test, các ghi chú này sẽ tự động chạy khi khai báo. Sẽ được học rõ ở bài sau.
⭐️ Tạo class TaurusAppTest
Dùng để khởi tạo driver Appium, mở app mobile và thiết lập các thông số cho Appium server như plugins, host, port, app info,...
Lưu ý: Tất cả các class test cases cần kế thừa lại class BaseTest để nhận khởi tạo driver và kết nối đến app mobile trước khi chạy test.
Thiết lập bên package test của project Maven. Tạo package con testcases để lưu vào cho rõ ràng.
package com.anhtester.testcases;

import com.anhtester.common.BaseTest;
import com.anhtester.drivers.DriverManager;
import io.appium.java_client.AppiumBy;
import org.openqa.selenium.WebElement;
import org.testng.annotations.Test;

public class TaurusAppTest extends BaseTest {
    @Test
    public void testLoginTaurusApp() {
        // Tìm và tương tác với các phần tử giao diện
        // Nhập email
        WebElement inputEmail = DriverManager.getDriver().findElement(AppiumBy.xpath("(//android.view.View[@content-desc=\"Mobile App Flutter Beta\"]/following-sibling::android.widget.EditText)[1]"));
        inputEmail.click();
        inputEmail.sendKeys("admin");

        // Nhập password
        WebElement inputPassword = DriverManager.getDriver().findElement(AppiumBy.xpath("(//android.view.View[@content-desc=\"Mobile App Flutter Beta\"]/following-sibling::android.widget.EditText)[2]"));
        inputPassword.click();
        inputPassword.sendKeys("admin");

        // Nhấn nút "Sign in"
        WebElement signInButton = DriverManager.getDriver().findElement(AppiumBy.accessibilityId("Sign in"));
        signInButton.click();

        // Đợi sau khi nhấn nút Sign in
        try {
            Thread.sleep(3000);
        } catch (InterruptedException e) {
            throw new RuntimeException(e);
        }

        // Kiểm tra kết quả đăng nhập
        // Ví dụ: Tìm kiếm một phần tử chỉ xuất hiện khi đăng nhập thành công
        WebElement menuElement = DriverManager.getDriver().findElement(AppiumBy.accessibilityId("Menu"));
        if (menuElement.isDisplayed()) {
            System.out.println("Login thành công!");
        } else {
            System.out.println("Login thất bại!");
        }
    }
}
Ghi chú @Test đại diện cho 1 test case. Có @Test thì nút Run mới hiện để nhấn chạy.
Giờ các bạn nhấn nút Run để chạy và xem kết quả thôi nào.
- Trình tự thì class BaseTest chạy trước và phần @BeforeSuite sẽ chạy đầu tiên, kiểm tra các HOST và PORT để buộc dừng nó trước khi khởi chạy.
- Tiếp đến phần @BeforeTest sẽ chạy để khởi tạo driver appium và kết nối đến app trên thiết bị mobile chỉ định.
- Tiếp theo phần @Test tại class test cases TaurusAppTest sẽ chạy theo các bước automation đã khai báo.
- Cuối cùng thì phần @AfterTest sẽ chạy để tắt driver appium và đóng service appium server.

✅ Cài đặt môi trường Maven cho MacOS
🔆 Cài JDK trên macOS
Mình hướng dẫn cài JDK 17 trên macOS theo 2 cách phổ biến nhất. Bạn dùng Mac Intel hay Apple Silicon (M1/M2/M3/M4/M5) đều ổn.
✅ Cách 1 (Khuyến nghị): Cài bằng Homebrew
Nhanh – gọn – sạch – dễ update 👍
1️⃣ Kiểm tra Homebrew
Mở Terminal và chạy:
Nếu chưa có Homebrew:
2️⃣ Cài JDK 17
3️⃣ Set biến môi trường JAVA_HOME
Sau khi cài xong, chạy:
Nếu bạn dùng bash thì thay~/.zshrcbằng~/.bash_profile
4️⃣ Kiểm tra
Kết quả mong muốn:
✅ Cách 2: Cài thủ công từ Oracle (GUI)
Phù hợp nếu bạn không dùng Homebrew
1️⃣ Tải JDK 17
Vào trang Oracle:
Chọn:
-
macOS x64 (Intel)
-
macOS ARM64 (Apple Silicon)
2️⃣ Cài đặt
-
Mở file
.dmg -
Next → Install → Finish
JDK sẽ nằm tại:
3️⃣ Set JAVA_HOME
Mở Terminal:
4️⃣ Kiểm tra
🔍 Kiểm tra tất cả JDK đang có
/usr/libexec/java_home -V
🔆 Cài Maven trên macOS
🟦 Cách 1: Cài Maven bằng Homebrew (đơn giản nhất)
Nếu bạn đã có Homebrew thì chỉ cần 1 lệnh:
Kiểm tra phiên bản:
Nếu hiện ra version Maven + Java là bạn đã cài thành công.
Nếu bạn cài Maven theo Cách 1 (Homebrew) thì KHÔNG cần tự thêm Maven vào PATH 👍
🟩 Cách 2: Cài Maven thủ công (manual install)
Dành cho máy không muốn dùng Homebrew hoặc cần bản Maven cụ thể.
Bước 1: Tải Maven
Vào trang chính thức:
https://maven.apache.org/download.cgi
→ Download bản Binary zip archive.
Bước 2: Giải nén
Giải nén file vào thư mục bạn muốn, ví dụ:
Bước 3: Thêm Maven vào PATH
Mở file cấu hình shell:
-
Nếu bạn dùng zsh (macOS mới):
-
Nếu dùng bash:
Thêm vào cuối file:
Lưu lại rồi chạy: