NỘI DUNG BÀI HỌC
✅Cách xử lý Scroll trên Flutter app
✅Cách xử lý Scroll trên Native app
1. Sử dụng W3C Actions API để thực thi hành động scroll
Sử dụng 2 class chính của Selenium là PointerInput và Sequence. Sử dụng lại chính hàm swipe hôm trước đã chỉ cho các bạn.
public void swipe(int startX, int startY, int endX, int endY, int durationMillis) {
    PointerInput finger = new PointerInput(PointerInput.Kind.TOUCH, "finger");
    Sequence swipe = new Sequence(finger, 1);
    swipe.addAction(finger.createPointerMove(Duration.ofMillis(0), PointerInput.Origin.viewport(), startX, startY));
    swipe.addAction(finger.createPointerDown(0));
    swipe.addAction(finger.createPointerMove(Duration.ofMillis(durationMillis), PointerInput.Origin.viewport(), endX, endY));
    swipe.addAction(finger.createPointerUp(0));
    DriverManager.getDriver().perform(Collections.singletonList(swipe));
}
@Test
public void testScrollUsingW3CActions() {
    swipe(670, 2442, 670, 1200, 1000);
    swipe(670, 2442, 670, 1200, 1000);
    swipe(670, 2442, 670, 1200, 1000);
}
2. Sử dụng Gesture mobile command cho Android và iOS
Sử dụng hàm executeScript với thuộc tính "mobile: scrollGesture"
public void scrollGestureCommand() {
    // Scroll gesture cho Android
    Map<String, Object> scrollParams = new HashMap<> ();
    scrollParams.put("left", 670); //vị trí mép trái vùng cuộn cách mép trái màn hình
    scrollParams.put("top", 500); //xác định mép trên của vùng cuộn
    scrollParams.put("width", 200); //chiều ngang của vùng kéo
    scrollParams.put("height", 2000); //chiều dài của vùng kéo
    scrollParams.put("direction", "down"); //Scroll theo chiều từ trên xuống dưới (up, down, left, right)
    scrollParams.put("percent", 1); //Scroll 100% của vùng kéo được chỉ định (width, height)

    // Thực hiện scroll gesture
    DriverManager.getDriver().executeScript("mobile: scrollGesture", scrollParams);
}
@Test
public void testScrollUsingMobileCommand() {
    scrollGestureCommand();
    scrollGestureCommand();
}
Full code demo:
package com.anhtester.Bai12_Scroll;

import com.anhtester.common.BaseTest;
import com.anhtester.drivers.DriverManager;
import org.openqa.selenium.interactions.PointerInput;
import org.openqa.selenium.interactions.Sequence;
import org.testng.annotations.Test;

import java.time.Duration;
import java.util.Collections;
import java.util.HashMap;
import java.util.Map;

public class DemoScrollNativeApp extends BaseTest {

    public void swipe(int startX, int startY, int endX, int endY, int durationMillis) {
        PointerInput finger = new PointerInput(PointerInput.Kind.TOUCH, "finger");
        Sequence swipe = new Sequence(finger, 1);
        swipe.addAction(finger.createPointerMove(Duration.ofMillis(0), PointerInput.Origin.viewport(), startX, startY));
        swipe.addAction(finger.createPointerDown(0));
        swipe.addAction(finger.createPointerMove(Duration.ofMillis(durationMillis), PointerInput.Origin.viewport(), endX, endY));
        swipe.addAction(finger.createPointerUp(0));
        DriverManager.getDriver().perform(Collections.singletonList(swipe));
    }

    public void scrollGestureCommand() {
        // Scroll gesture cho Android
        Map<String, Object> scrollParams = new HashMap<>();
        scrollParams.put("left", 670); //vị trí mép trái vùng cuộn cách mép trái màn hình
        scrollParams.put("top", 500); //xác định mép trên của vùng cuộn
        scrollParams.put("width", 200); //chiều ngang của vùng kéo
        scrollParams.put("height", 2000); //chiều dài của vùng kéo
        scrollParams.put("direction", "down"); //Scroll theo chiều từ trên xuống dưới (up, down, left, right)
        scrollParams.put("percent", 1); //Scroll 100% của vùng kéo được chỉ định (width, height)

        // Thực hiện scroll gesture
        DriverManager.getDriver().executeScript("mobile: scrollGesture", scrollParams);
    }

    @Test
    public void testScrollUsingW3CActions() {
        swipe(670, 2442, 670, 1200, 1000);
        swipe(670, 2442, 670, 1200, 1000);
        swipe(670, 2442, 670, 1200, 1000);
    }

    @Test
    public void testScrollUsingMobileCommand() {
        scrollGestureCommand();
        scrollGestureCommand();
    }

}
✅Cách xử lý Scroll trên Flutter app
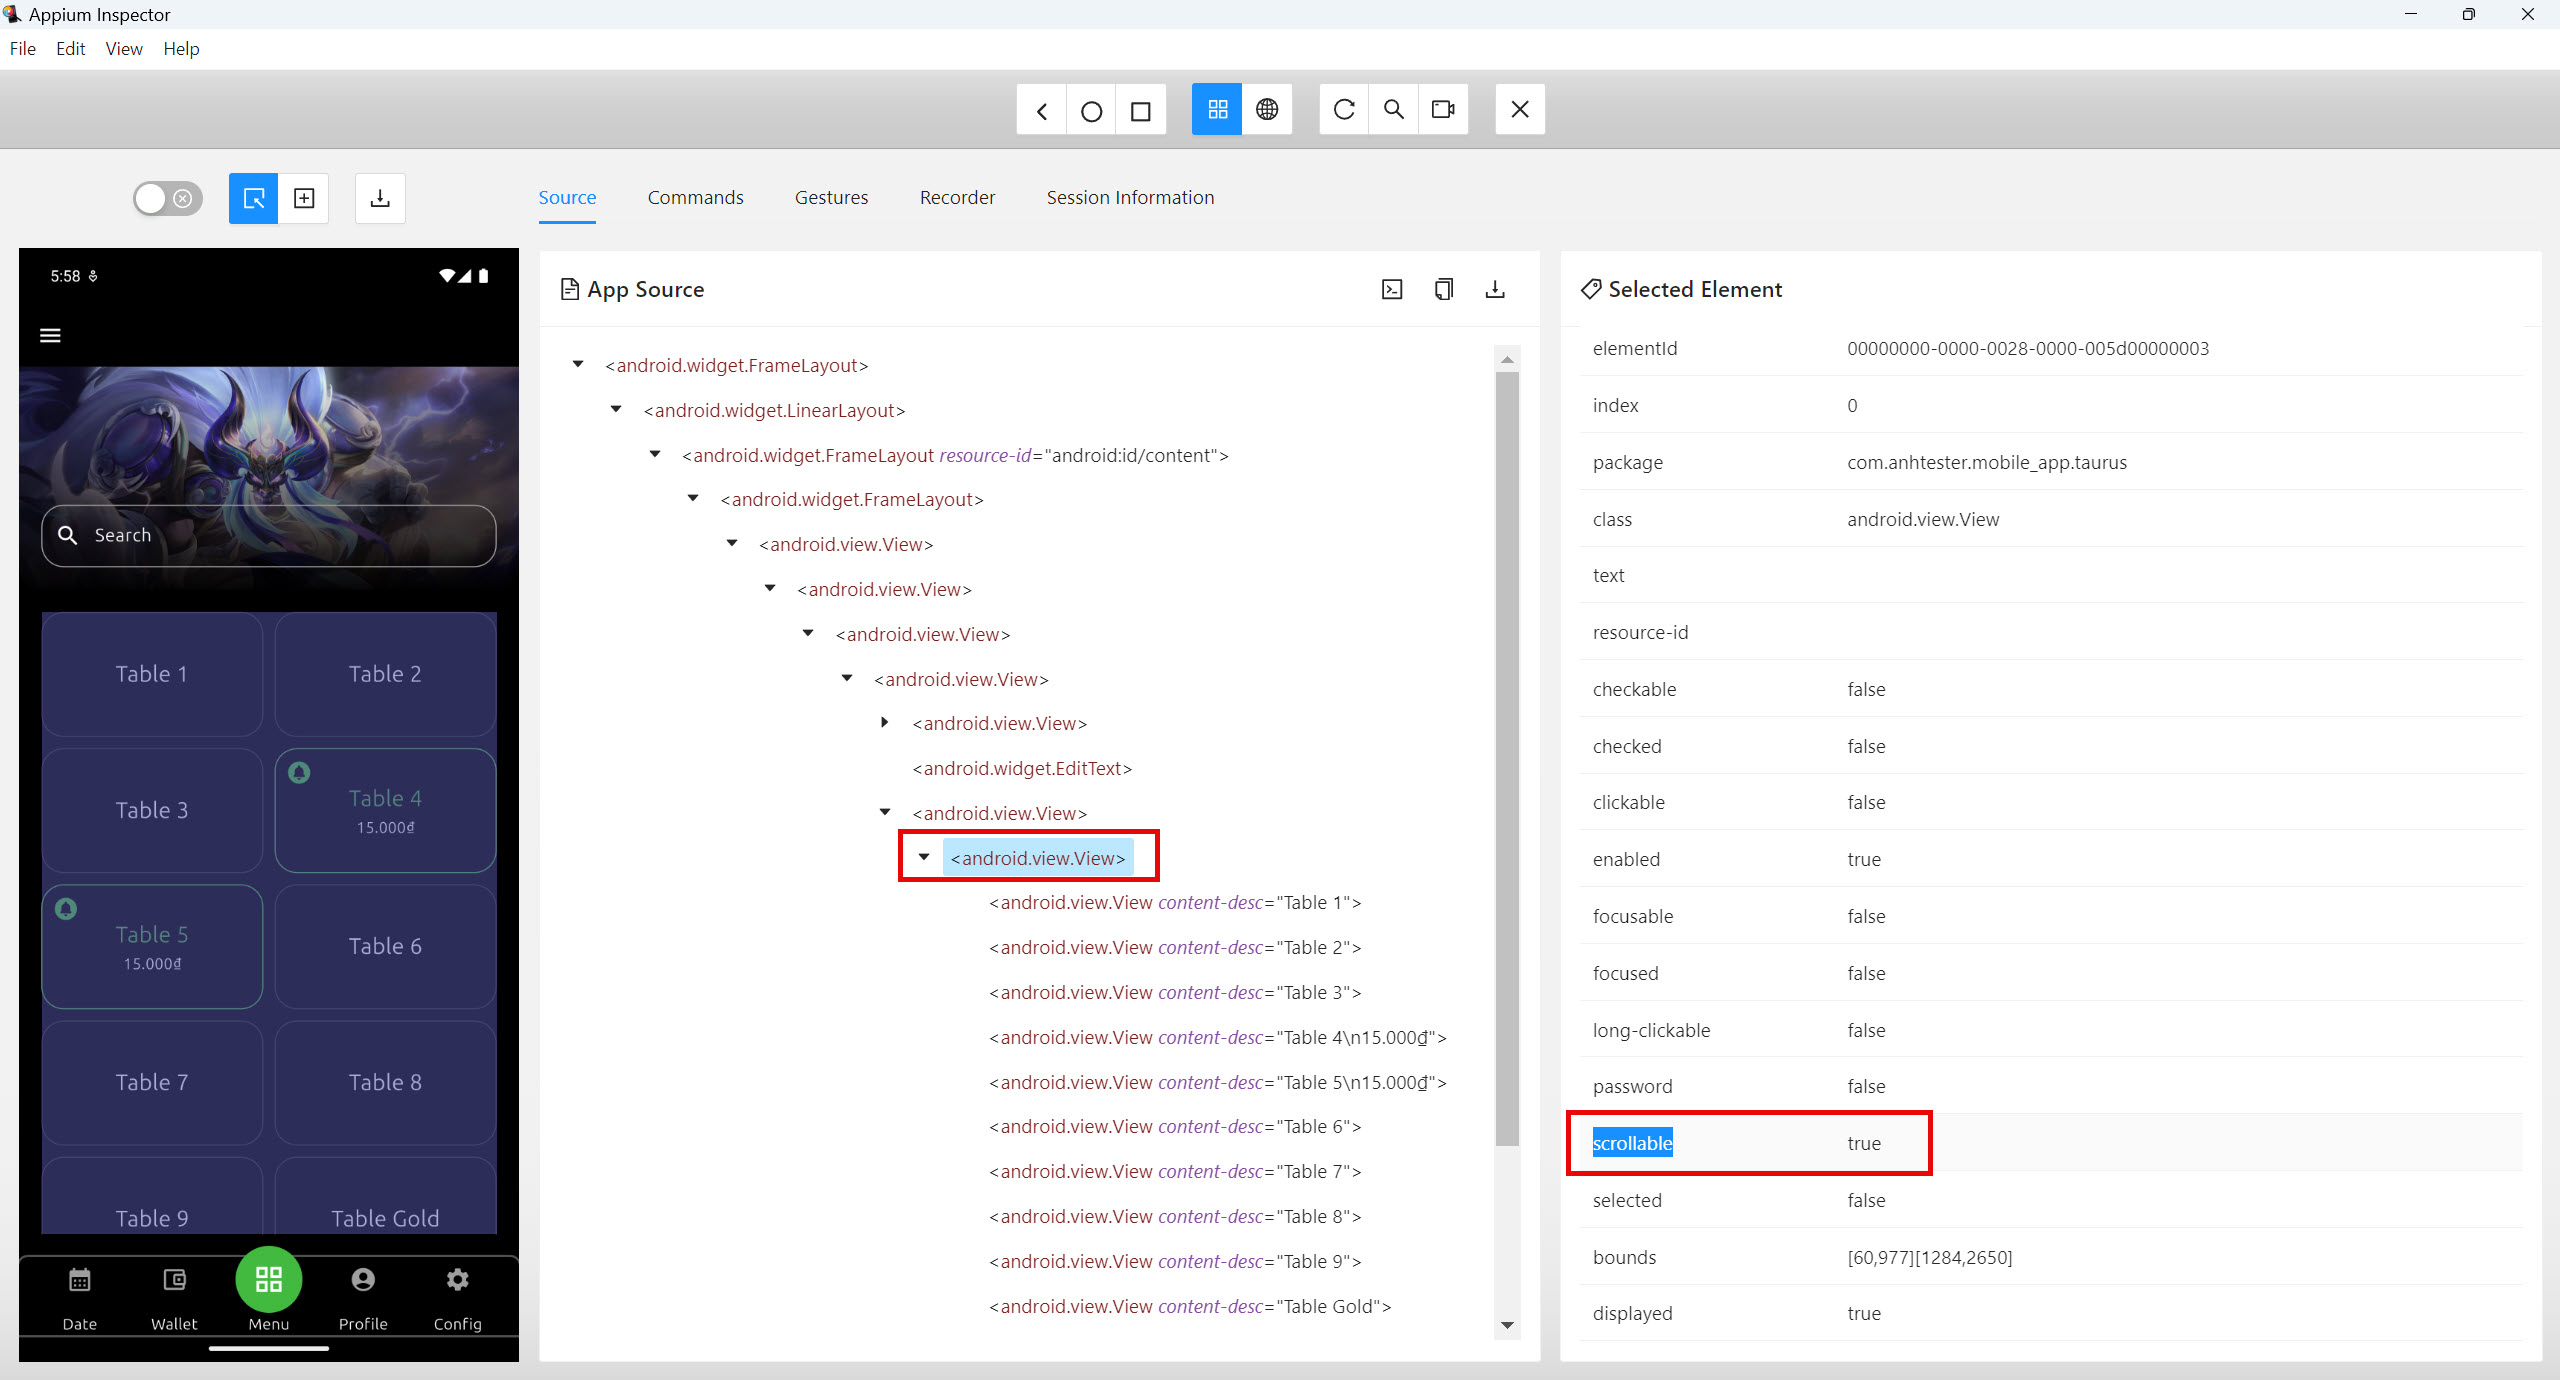
Xử lý giống với Swipe, tuy nhiên tuỳ chỉnh một chút chỗ Element đầu vào tại vị trí có thể cuộn được. (scrollable=true)
// 1. Tìm phần tử có khả năng cuộn (ví dụ: View/ListView)
WebElement scrollableElement = DriverManager.getDriver().findElement(AppiumBy.xpath("//android.widget.FrameLayout[@resource-id=\"android:id/content\"]/android.widget.FrameLayout/android.view.View/android.view.View/android.view.View/android.view.View/android.view.View[2]/android.view.View")); // Thay đổi locator phù hợp
Point elementCenter = scrollableElement.getRect().getPoint().moveBy(scrollableElement.getSize().getWidth() / 2, scrollableElement.getSize().getHeight() / 2);

// 2. Tạo PointerInput
PointerInput finger = new PointerInput(PointerInput.Kind.TOUCH, "finger");

// 3. Tạo Sequence (chuỗi hành động) để cuộn xuống
Sequence scrollDownSequence = new Sequence(finger, 1)
    .addAction(finger.createPointerMove(Duration.ofMillis(0), PointerInput.Origin.viewport(), elementCenter.getX(), elementCenter.getY())) // Di chuyển pointer đến tâm phần tử
    .addAction(finger.createPointerDown(PointerInput.MouseButton.LEFT.asArg())) // Nhấn pointer xuống
    .addAction(finger.createPointerMove(Duration.ofMillis(300), PointerInput.Origin.viewport(), elementCenter.getX(), elementCenter.getY() - 1000)) // Di chuyển pointer lên (cuộn xuống) 500 pixels
    .addAction(finger.createPointerUp(PointerInput.MouseButton.LEFT.asArg())); // Nhấc pointer lên

// 4. Thực hiện Sequence
DriverManager.getDriver().perform(Collections.singletonList(scrollDownSequence));
Demo với app flutter Taurus:
package com.anhtester.Bai12_Scroll;

import com.anhtester.common.BaseTestTaurusApp;
import com.anhtester.drivers.DriverManager;
import com.anhtester.keywords.MobileUI;
import io.appium.java_client.AppiumBy;
import org.openqa.selenium.Point;
import org.openqa.selenium.WebElement;
import org.openqa.selenium.interactions.PointerInput;
import org.openqa.selenium.interactions.Sequence;
import org.testng.annotations.Test;

import java.time.Duration;
import java.util.Collections;

public class DemoScrollFlutterApp extends BaseTestTaurusApp {

    @Test
    public void testScrollInFlutterApp() {
        loginTaurusApp();
        downloadDataFromServer(1);
        DriverManager.getDriver().findElement(AppiumBy.accessibilityId("Back")).click();
        MobileUI.sleep(2);
        DriverManager.getDriver().findElement(AppiumBy.accessibilityId("Menu")).click();
        MobileUI.sleep(4);

        // 1. Tìm phần tử có khả năng cuộn (ví dụ: View/ListView)
        WebElement scrollableElement = DriverManager.getDriver().findElement(AppiumBy.xpath("//android.widget.FrameLayout[@resource-id=\"android:id/content\"]/android.widget.FrameLayout/android.view.View/android.view.View/android.view.View/android.view.View/android.view.View[2]/android.view.View")); // Thay đổi locator phù hợp
        Point elementCenter = scrollableElement.getRect().getPoint().moveBy(scrollableElement.getSize().getWidth() / 2, scrollableElement.getSize().getHeight() / 2);

        // 2. Tạo PointerInput
        PointerInput finger = new PointerInput(PointerInput.Kind.TOUCH, "finger");

        // 3. Tạo Sequence (chuỗi hành động) để cuộn xuống
        Sequence scrollDownSequence = new Sequence(finger, 1)
                .addAction(finger.createPointerMove(Duration.ofMillis(0), PointerInput.Origin.viewport(), elementCenter.getX(), elementCenter.getY())) // Di chuyển pointer đến tâm phần tử
                .addAction(finger.createPointerDown(PointerInput.MouseButton.LEFT.asArg())) // Nhấn pointer xuống
                .addAction(finger.createPointerMove(Duration.ofMillis(300), PointerInput.Origin.viewport(), elementCenter.getX(), elementCenter.getY() - 1000)) // Di chuyển pointer lên (cuộn xuống) 500 pixels
                .addAction(finger.createPointerUp(PointerInput.MouseButton.LEFT.asArg())); // Nhấc pointer lên

        // 4. Thực hiện Sequence
        DriverManager.getDriver().perform(Collections.singletonList(scrollDownSequence));

        MobileUI.sleep(2);
    }

}
![[Appium Java] Bài 12 - Cách xử lý Scroll trên Native app và Flutter app](/uploads/course/banner_course_appium_java_online_anh_tester.jpg)
 Zalo
Zalo