![[Appium Java] Bài 11 - Cách xử lý Notification và xác nhận Permission](/uploads/course/banner_course_appium_java_online_anh_tester.jpg)
NỘI DUNG BÀI HỌC
✅Cách xử lý Notification trong Appium Java
✅Cách xác nhận Permission trong Appium Java
✅Notification và Permission là gì?
Notification (Thông báo) và Permission (Quyền) là hai khái niệm quan trọng trong hệ điều hành Android, ảnh hưởng trực tiếp đến trải nghiệm người dùng và bảo mật của thiết bị. Dưới đây là giải thích chi tiết về hai khái niệm này:
1. Notification (Thông báo)
Khái niệm
Thông báo là những tin nhắn hoặc cảnh báo ngắn gọn xuất hiện trên màn hình điện thoại, giúp người dùng nắm bắt thông tin quan trọng từ ứng dụng mà không cần phải mở ứng dụng đó.
Vai trò
- Cập nhật thông tin: Thông báo giúp người dùng luôn được cập nhật về các sự kiện mới nhất, tin nhắn, email, thông báo từ mạng xã hội, lịch hẹn, v.v.
- Tương tác nhanh chóng: Người dùng có thể tương tác trực tiếp với thông báo để thực hiện các hành động nhanh chóng như trả lời tin nhắn, xem chi tiết sự kiện, v.v.
- Cá nhân hóa: Người dùng có thể tùy chỉnh cách thông báo hiển thị, âm thanh, mức độ quan trọng cho từng ứng dụng.
Các loại thông báo
- Thông báo dạng văn bản: Hiển thị nội dung tin nhắn, thông báo ngắn gọn.
- Thông báo dạng hình ảnh: Hiển thị hình ảnh liên quan đến thông báo.
- Thông báo đa phương tiện: Kết hợp văn bản, hình ảnh, video, âm thanh.
Cách quản lý thông báo
- Bật/tắt thông báo cho từng ứng dụng: Người dùng có thể tùy chỉnh bật hoặc tắt thông báo cho từng ứng dụng trong phần cài đặt của điện thoại.
- Tùy chỉnh âm thanh thông báo: Chọn âm thanh thông báo riêng cho từng ứng dụng.
- Tùy chỉnh mức độ quan trọng của thông báo: Đánh dấu thông báo là quan trọng để chúng nổi bật hơn.
2. Permission (Quyền)
Khái niệm
Quyền là sự cho phép mà ứng dụng yêu cầu người dùng cấp cho phép ứng dụng truy cập vào các tài nguyên hoặc chức năng nhất định trên thiết bị.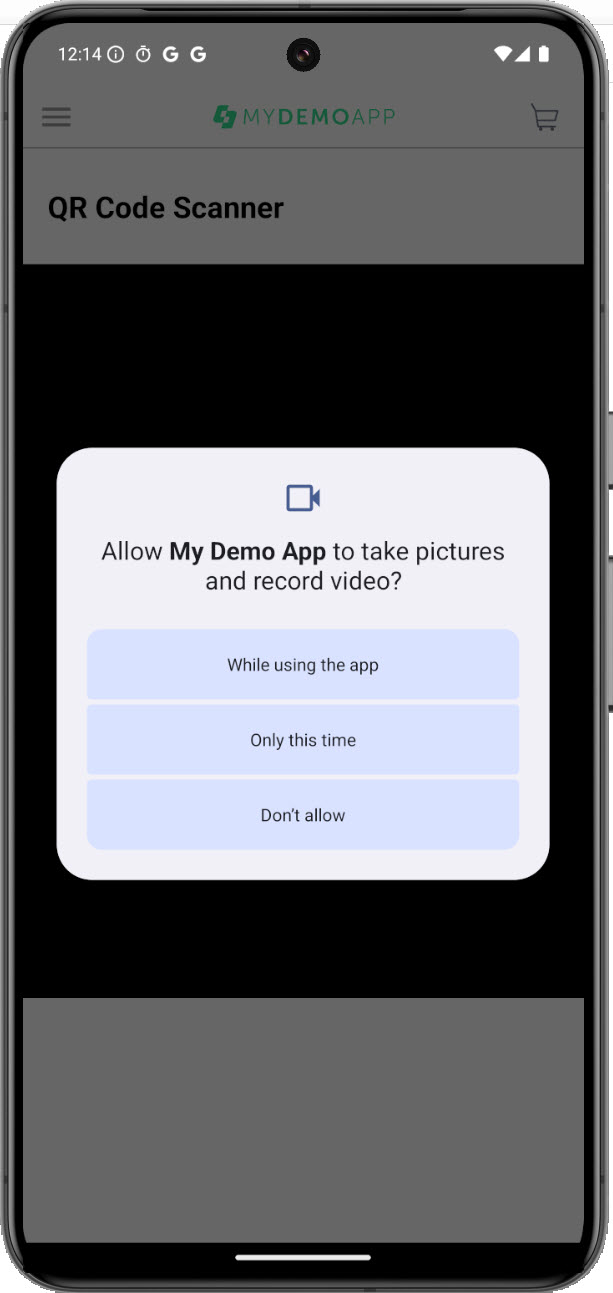
Vai trò
- Bảo vệ người dùng: Quyền giúp bảo vệ người dùng khỏi các ứng dụng độc hại hoặc lạm dụng, ngăn chặn chúng truy cập vào dữ liệu cá nhân, thông tin nhạy cảm.
- Kiểm soát truy cập: Người dùng có quyền quyết định cấp hay từ chối quyền truy cập của ứng dụng vào các tài nguyên như danh bạ, vị trí, camera, micro, bộ nhớ, v.v.
Các loại quyền
- Quyền nguy hiểm: Cho phép ứng dụng truy cập vào các tài nguyên nhạy cảm như danh bạ, vị trí, camera, micro, v.v.
- Quyền bình thường: Cho phép ứng dụng truy cập vào các tài nguyên ít nhạy cảm hơn như internet, trạng thái mạng, v.v.
Cách quản lý quyền
- Cấp/từ chối quyền: Khi ứng dụng yêu cầu quyền, người dùng có thể lựa chọn cấp hoặc từ chối quyền truy cập.
- Xem lại và thu hồi quyền: Người dùng có thể xem lại danh sách các quyền đã cấp cho ứng dụng và thu hồi quyền truy cập bất kỳ lúc nào trong phần cài đặt của điện thoại.
✅Cách xử lý Notification trong Appium Java
🔆Xử lý Notification trên Android native và Flutter app
1. Mở khay Notification (Notification Shade):
Bạn có thể sử dụng phương thức openNotifications() để mở khay thông báo. (thao tác tay tương ứng cuộn từ trên màn hình xuống)
driver.openNotifications();Lưu ý: driver phải thuộc dạng AndroidDriver chứ không phải AppiumDriver như đã dùng trước đó.
Nên cần thiết kế lại class BaseTest hoặc tạo thêm class mới BaseTestAndroidPlatform.
BaseTestAndroidPlatform.java
package com.anhtester.common;

import com.anhtester.drivers.AndroidDriverManager;
import com.anhtester.helpers.SystemHelpers;
import io.appium.java_client.android.AndroidDriver;
import io.appium.java_client.android.options.UiAutomator2Options;
import io.appium.java_client.service.local.AppiumDriverLocalService;
import io.appium.java_client.service.local.AppiumServiceBuilder;
import io.appium.java_client.service.local.flags.GeneralServerFlag;
import org.testng.annotations.AfterTest;
import org.testng.annotations.BeforeSuite;
import org.testng.annotations.BeforeTest;

import java.net.MalformedURLException;
import java.net.URL;
import java.time.Duration;

public class BaseTestAndroidPlatform {

    private AppiumDriverLocalService service;
    private String HOST = "127.0.0.1";
    private String PORT = "4723";
    private int TIMEOUT_SERVICE = 60;

    @BeforeSuite
    public void runAppiumServer() {
        //Kill process on port
        SystemHelpers.killProcessOnPort("4723");

        //Build the Appium service
        AppiumServiceBuilder builder = new AppiumServiceBuilder();
        builder.withIPAddress(HOST);
        builder.usingPort(Integer.parseInt(PORT));
        builder.withArgument(GeneralServerFlag.LOG_LEVEL, "info"); // Set log level (optional)
        builder.withTimeout(Duration.ofSeconds(TIMEOUT_SERVICE));

        //Start the server with the builder
        service = AppiumDriverLocalService.buildService(builder);
        service.start();

        if (service.isRunning()) {
            System.out.println("##### Appium server started on " + HOST + ":" + PORT);
        } else {
            System.out.println("Failed to start Appium server.");
        }

    }

    @BeforeTest
    public void setUpDriver() {
        AndroidDriver driver;
        UiAutomator2Options options = new UiAutomator2Options();

        System.out.println("***SERVER ADDRESS: " + HOST);
        System.out.println("***SERVER POST: " + PORT);

        options.setPlatformName("Android");
        options.setPlatformVersion("14");
        options.setAutomationName("UiAutomator2");
        options.setDeviceName("Pixel_9_Pro_XL_API_34");
        options.setAppPackage("com.saucelabs.mydemoapp.android");
        options.setAppActivity("com.saucelabs.mydemoapp.android.view.activities.SplashActivity");
        options.setNoReset(false);
        options.setFullReset(false);

        try {
            driver = new AndroidDriver(new URL("http://" + HOST + ":" + PORT), options);
            AndroidDriverManager.setDriver(driver);
        } catch (MalformedURLException e) {
            throw new RuntimeException(e);
        }

        driver.manage().timeouts().implicitlyWait(Duration.ofSeconds(10));

    }

    @AfterTest
    public void tearDownDriver() {
        if (AndroidDriverManager.getDriver() != null) {
            AndroidDriverManager.quitDriver();
        }
        if (service != null && service.isRunning()) {
            service.stop();
            System.out.println("##### Appium server stopped.");
        }
    }

    public void sleep(double second) {
        try {
            Thread.sleep((long) (1000 * second));
        } catch (InterruptedException e) {
            throw new RuntimeException(e);
        }
    }

}
Chú ý 2 hàm setUpDriver và tearDownDriver đang dùng AndroidDriver driver để khởi tạo driver toàn cục và set giá trị driver vào class mới AndroidDriverManager.
AndroidDriverManager.java
package com.anhtester.drivers;

import io.appium.java_client.android.AndroidDriver;

public class AndroidDriverManager {
    private static ThreadLocal<AndroidDriver> driver = new ThreadLocal<>();

    public static void setDriver(AndroidDriver driverInstance) {
        driver.set(driverInstance);
    }

    public static AndroidDriver getDriver() {
        return driver.get();
    }

    public static void closeDriver() {
        if (driver.get() != null) {
            getDriver().close();
        }
    }

    public static void quitDriver() {
        if (driver.get() != null) {
            getDriver().quit();
            driver.remove();
        }
    }
}
Đã thay thế AppiumDriver thành AndroidDriver để xử lý chuyên cho nền tảng Android.
2. Lấy Thông tin Notifications:
Sau khi mở khay thông báo, bạn có thể tìm kiếm các thông báo dựa trên tiêu đề hoặc nội dung mô tả bằng cách sử dụng các bộ định vị (locator) của Appium (ví dụ: xpath, id, accessibilityId).
Mặc định trên Android Native để lấy Title notification thì dựa vào ID là "android:id/title"
Ví dụ, để lấy danh sách tất cả các thông báo và in ra tiêu đề của mỗi thông báo:
List<WebElement> notifications = AndroidDriverManager.getDriver().findElements(AppiumBy.id("android:id/title"));
System.out.println("Danh sách tiêu đề trong thông báo: ");
for (WebElement notification: notifications) {
    System.out.println(notification.getText());
}
Mặc định trên Android Native để lấy Description notification thì dựa vào ID là "android:id/text"
//Get các mô tả của thông báo
List < WebElement > descriptions = AndroidDriverManager.getDriver().findElements(AppiumBy.id("android:id/text"));
System.out.println("Danh sách mô tả trong thông báo: ");

for (WebElement description: descriptions) {
    try {
        String descriptionText = description.getText();
        System.out.println("- Mô tả thông báo: " + descriptionText);
    } catch (NoSuchElementException e) {
        System.out.println("*** Không tìm thấy phần mô tả cho thông báo này (hoặc không có mô tả).");
    }
}
3. Đóng phần Notification sau khi xử lý:
Sử dụng phím "Back" của thiết bị: Đây là cách đơn giản và phổ biến nhất. Bạn có thể mô phỏng thao tác nhấn phím Back bằng lệnh:
driver.navigate().back();Lệnh này sẽ gửi lệnh "Back" đến thiết bị, thường sẽ đóng Notification Shade nếu nó đang mở.
Một cách khác để đóng Notification Shade là vuốt lên từ dưới cùng màn hình. Bạn có thể mô phỏng thao tác này bằng thao tác Swipe đã học ở bài trước.
public void swipe(int startX, int startY, int endX, int endY, int durationMillis) {
    PointerInput finger = new PointerInput(PointerInput.Kind.TOUCH, "finger");
    Sequence swipe = new Sequence(finger, 1);
    swipe.addAction(finger.createPointerMove(Duration.ofMillis(0), PointerInput.Origin.viewport(), startX, startY));
    swipe.addAction(finger.createPointerDown(0));
    swipe.addAction(finger.createPointerMove(Duration.ofMillis(durationMillis), PointerInput.Origin.viewport(), endX, endY));
    swipe.addAction(finger.createPointerUp(0));
    AndroidDriverManager.getDriver().perform(Collections.singletonList(swipe));
}
//Kéo từ dưới màn hình lên sát mép trên
//Demo màn hình 1344x2992 pixel
swipe(600, 2700, 600, 300, 200);⭐️Demo code handle Notifications trong Appium Java trên Android Native:
package com.anhtester.Bai11_Notification_Permission;

import com.anhtester.common.BaseTestAndroidPlatform;
import com.anhtester.drivers.AndroidDriverManager;
import com.anhtester.keywords.MobileUI;
import io.appium.java_client.AppiumBy;
import org.openqa.selenium.NoSuchElementException;
import org.openqa.selenium.WebElement;
import org.openqa.selenium.interactions.PointerInput;
import org.openqa.selenium.interactions.Sequence;
import org.testng.annotations.Test;

import java.time.Duration;
import java.util.Collections;
import java.util.List;

public class DemoNotification extends BaseTestAndroidPlatform {

    @Test
    public void testHandleNotification() {
        //Mở phần thông báo bên trên cuộn xuống
        AndroidDriverManager.getDriver().openNotifications();

        //Get các tiêu đề của thông báo
        List<WebElement> notifications = AndroidDriverManager.getDriver().findElements(AppiumBy.id("android:id/title"));
        System.out.println("Danh sách tiêu đề trong thông báo: ");
        for (WebElement notification : notifications) {
            System.out.println(notification.getText());
        }

        MobileUI.sleep(2);

        //Get các mô tả của thông báo
        List<WebElement> descriptions = AndroidDriverManager.getDriver().findElements(AppiumBy.id("android:id/text"));
        System.out.println("Danh sách mô tả trong thông báo: ");

        for (WebElement description : descriptions) {
            try {
                String descriptionText = description.getText();
                System.out.println("- Mô tả thông báo: " + descriptionText);
            } catch (NoSuchElementException e) {
                System.out.println("*** Không tìm thấy phần mô tả cho thông báo này (hoặc không có mô tả).");
            }
        }

        //Đóng phần Notification
        //AndroidDriverManager.getDriver().navigate().back();

        swipe(600, 2700, 600, 300, 200);

        MobileUI.sleep(3);
    }

    public void swipe(int startX, int startY, int endX, int endY, int durationMillis) {
        PointerInput finger = new PointerInput(PointerInput.Kind.TOUCH, "finger");
        Sequence swipe = new Sequence(finger, 1);
        swipe.addAction(finger.createPointerMove(Duration.ofMillis(0), PointerInput.Origin.viewport(), startX, startY));
        swipe.addAction(finger.createPointerDown(0));
        swipe.addAction(finger.createPointerMove(Duration.ofMillis(durationMillis), PointerInput.Origin.viewport(), endX, endY));
        swipe.addAction(finger.createPointerUp(0));
        AndroidDriverManager.getDriver().perform(Collections.singletonList(swipe));
    }

}
🔆Xử lý Notification trên iOS (iPhone)
Appium 2x hỗ trợ tương tác với Notification Center trên thiết bị iOS.
1. Mở Notification Center:
Để mở Notification Center trên iOS, bạn cần mô phỏng thao tác vuốt xuống từ phía trên cùng màn hình. Sử dụng lệnh mobile: swipeGesture trong Appium:
driver.executeScript("mobile: swipeGesture", ImmutableMap.of("direction", "down", "left", 500, "top", 0, "width", 0, "height", 500, "duration", 200));
2. Lấy Thông tin Notification:
Sau khi mở Notification Center, bạn cần xác định vị trí các thông báo bằng cách sử dụng các bộ định vị của Appium. Appium Inspector là công cụ quan trọng để xác định cấu trúc UI và bộ định vị phù hợp.
Thông thường, các thông báo iOS có thể được tìm thấy bằng cách sử dụng XCUIElementTypeNotification làm class name chung. Trong mỗi thông báo, bạn có thể tìm các phần tử con như XCUIElementTypeStaticText để lấy tiêu đề hoặc nội dung.
Ví dụ, để lấy danh sách tất cả các thông báo và in ra tiêu đề (nếu có):
List<WebElement> notifications = driver.findElements(AppiumBy.className("XCUIElementTypeNotification"));
System.out.println("Danh sách thông báo:");
for (WebElement notification : notifications) {
    try {
        WebElement titleElement = notification.findElement(AppiumBy.className("XCUIElementTypeStaticText"));
        System.out.println("- Tiêu đề: " + titleElement.getText());
    } catch (NoSuchElementException e) {
        System.out.println("- Không tìm thấy tiêu đề cho thông báo này.");
    }
}
3. Tương tác với Notification (Ví dụ: Nhấp vào Thông báo):
Để tương tác với một thông báo cụ thể, bạn cần xác định thông báo đó bằng bộ định vị (ví dụ: dựa trên tiêu đề hoặc một thuộc tính duy nhất khác) và sau đó sử dụng phương thức click().
Ví dụ (bộ định vị có thể cần điều chỉnh tùy thuộc vào ứng dụng):
WebElement notificationToClick = driver.findElement(AppiumBy.xpath("//XCUIElementTypeNotification[contains(@name, 'Tiêu đề thông báo bạn muốn nhấp')]"));
notificationToClick.click();
4. Đóng Notification Center:
Để đóng Notification Center, bạn có thể mô phỏng thao tác vuốt lên trên màn hình bằng mobile: swipeGesture:
driver.executeScript("mobile: swipeGesture", ImmutableMap.of("direction", "up", "left", 500, "top", 500, "width", 0, "height", -500, "duration", 200));✅Cách xác nhận Permission trong Appium Java
🔆Xử lý Permission trên Android
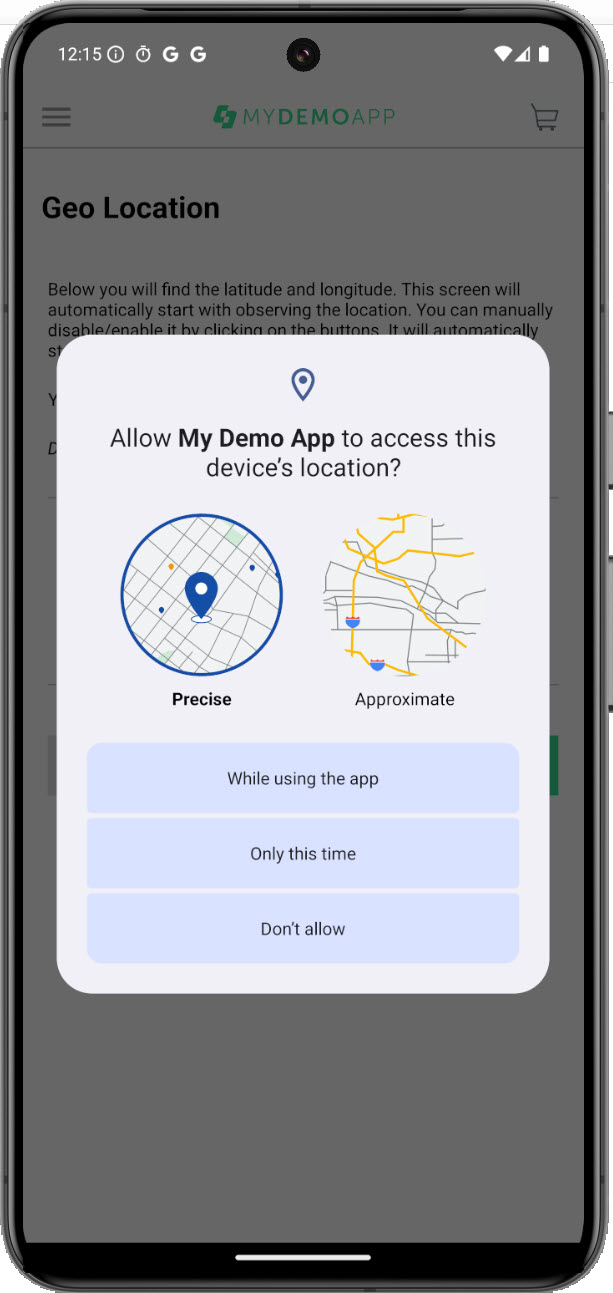
Demo trên app MyDemoApp gồm các bước sau: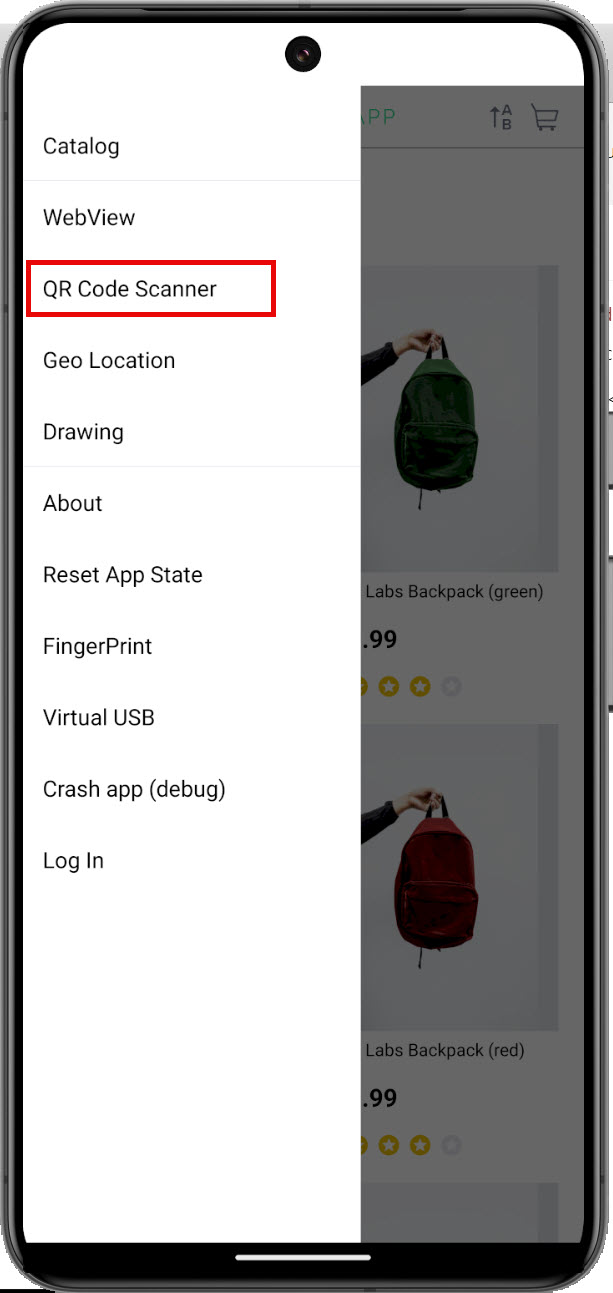
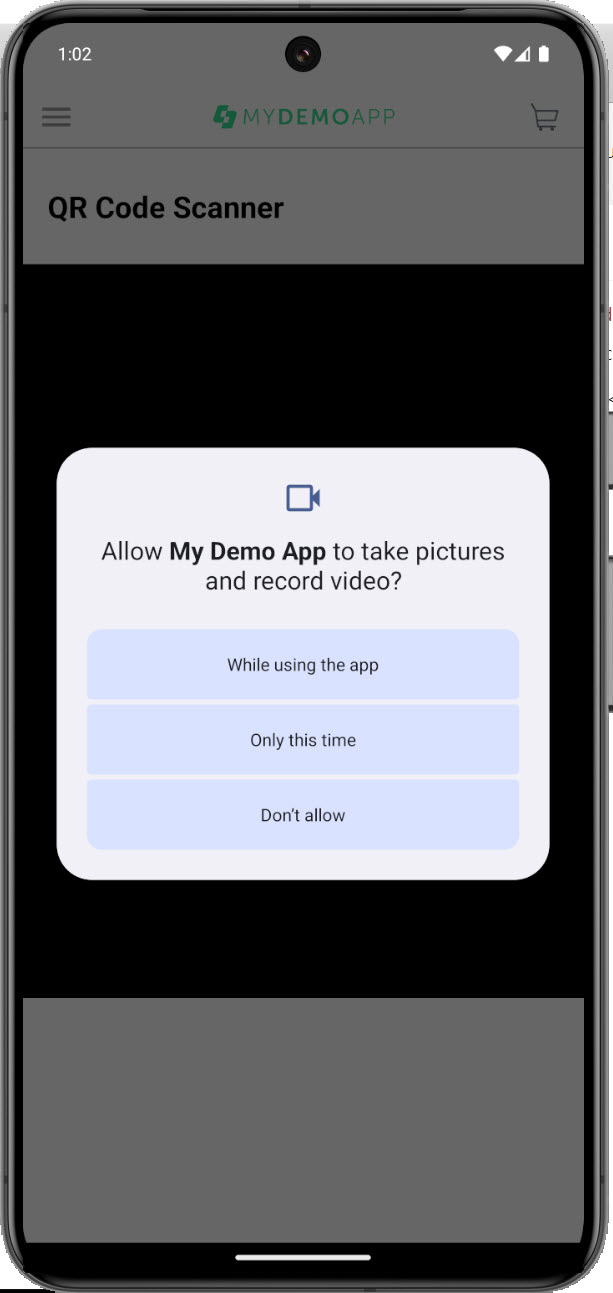
- While using the app: chấp nhận cho phép truy cập một lần này và sẽ không hỏi lại cho lần mở app sau. (lưu cache)
- Only this time: chấp nhận cho phép truy cập trên lần mở app này, lần sau mở app lại sẽ hỏi tiếp.
- Don't allow: không chấp nhận quyền truy cập.
Cách 1: dùng lệnh hỗ trợ từ UiAutomator2Options
Tại class BaseTest chúng ta thêm lệnh sau vào hàm setUpDriver:
options.setAutoGrantPermissions(true);Nó sẽ tương ứng với thao tác nhấn Only this time (cho phép truy cập)
Code demo tại class BaseTest đầy đủ:
@BeforeTest
public void setUpDriver() {
    AppiumDriver driver;
    UiAutomator2Options options = new UiAutomator2Options();

    System.out.println("***SERVER ADDRESS: " + HOST);
    System.out.println("***SERVER POST: " + PORT);

    options.setPlatformName("Android");
    options.setPlatformVersion("14");
    options.setAutomationName("UiAutomator2");
    options.setDeviceName("Pixel_9_Pro_XL_API_34");
    options.setAppPackage("com.saucelabs.mydemoapp.android");
    options.setAppActivity("com.saucelabs.mydemoapp.android.view.activities.SplashActivity");
    options.setNoReset(false);
    options.setFullReset(false);

    options.setAutoGrantPermissions(true);

    try {
        driver = new AppiumDriver(new URL("http://" + HOST + ":" + PORT), options);
        DriverManager.setDriver(driver);
    } catch (MalformedURLException e) {
        throw new RuntimeException(e);
    }

    driver.manage().timeouts().implicitlyWait(Duration.ofSeconds(10));

}
⭐️Demo code cho cách 1
package com.anhtester.Bai11_Notification_Permission;
import com.anhtester.common.BaseTest;
import com.anhtester.drivers.DriverManager;
import com.anhtester.keywords.MobileUI;
import io.appium.java_client.AppiumBy;
import org.testng.annotations.Test;
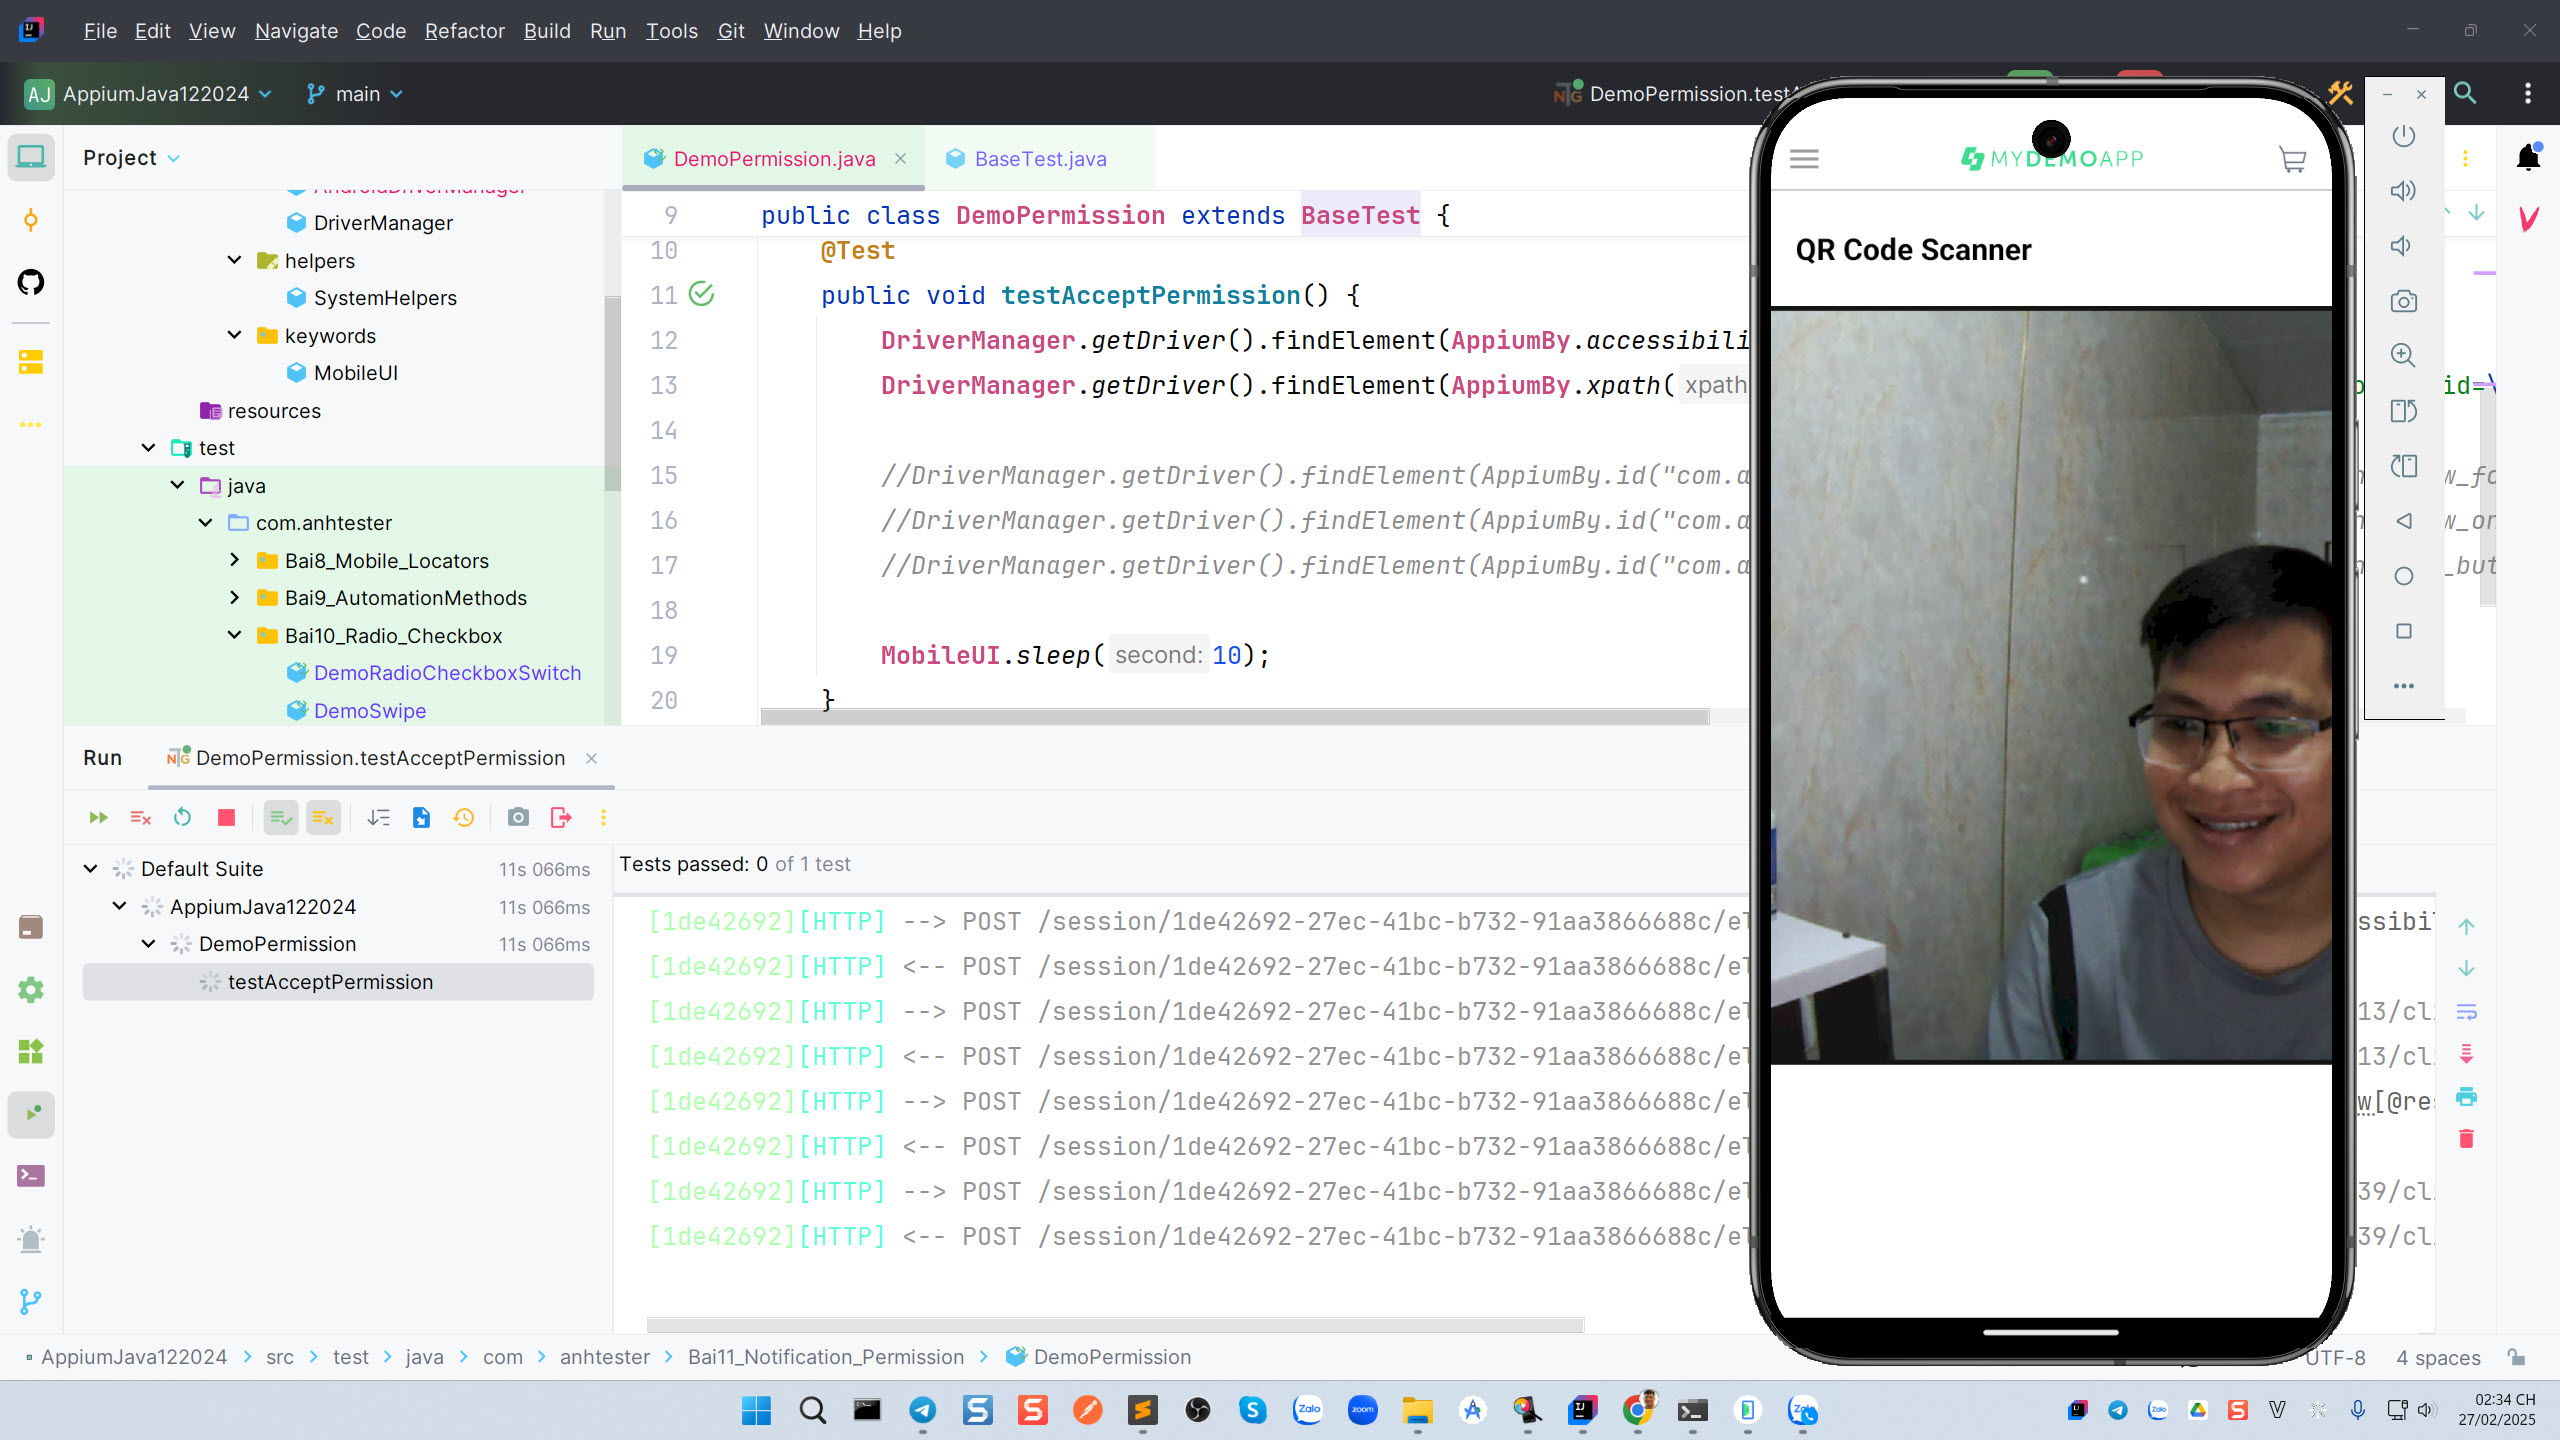
public class DemoPermission extends BaseTest {
@Test
public void testAcceptPermission() {
DriverManager.getDriver().findElement(AppiumBy.accessibilityId("View menu")).click();
DriverManager.getDriver().findElement(AppiumBy.xpath("//android.widget.TextView[@resource-id=\"com.saucelabs.mydemoapp.android:id/itemTV\" and @text=\"QR Code Scanner\"]")).click();
MobileUI.sleep(10);
}
}
Cách 2: dùng thao tác automation trên giao diện
Để xử lý chấp nhận từng permission thì chúng ta có thể bắt element của nó xong nhấn click. Nó sẽ có id rõ ràng, không cần phải dùng tới xpath. Còn đối với Flutter thì có thể dùng xpath.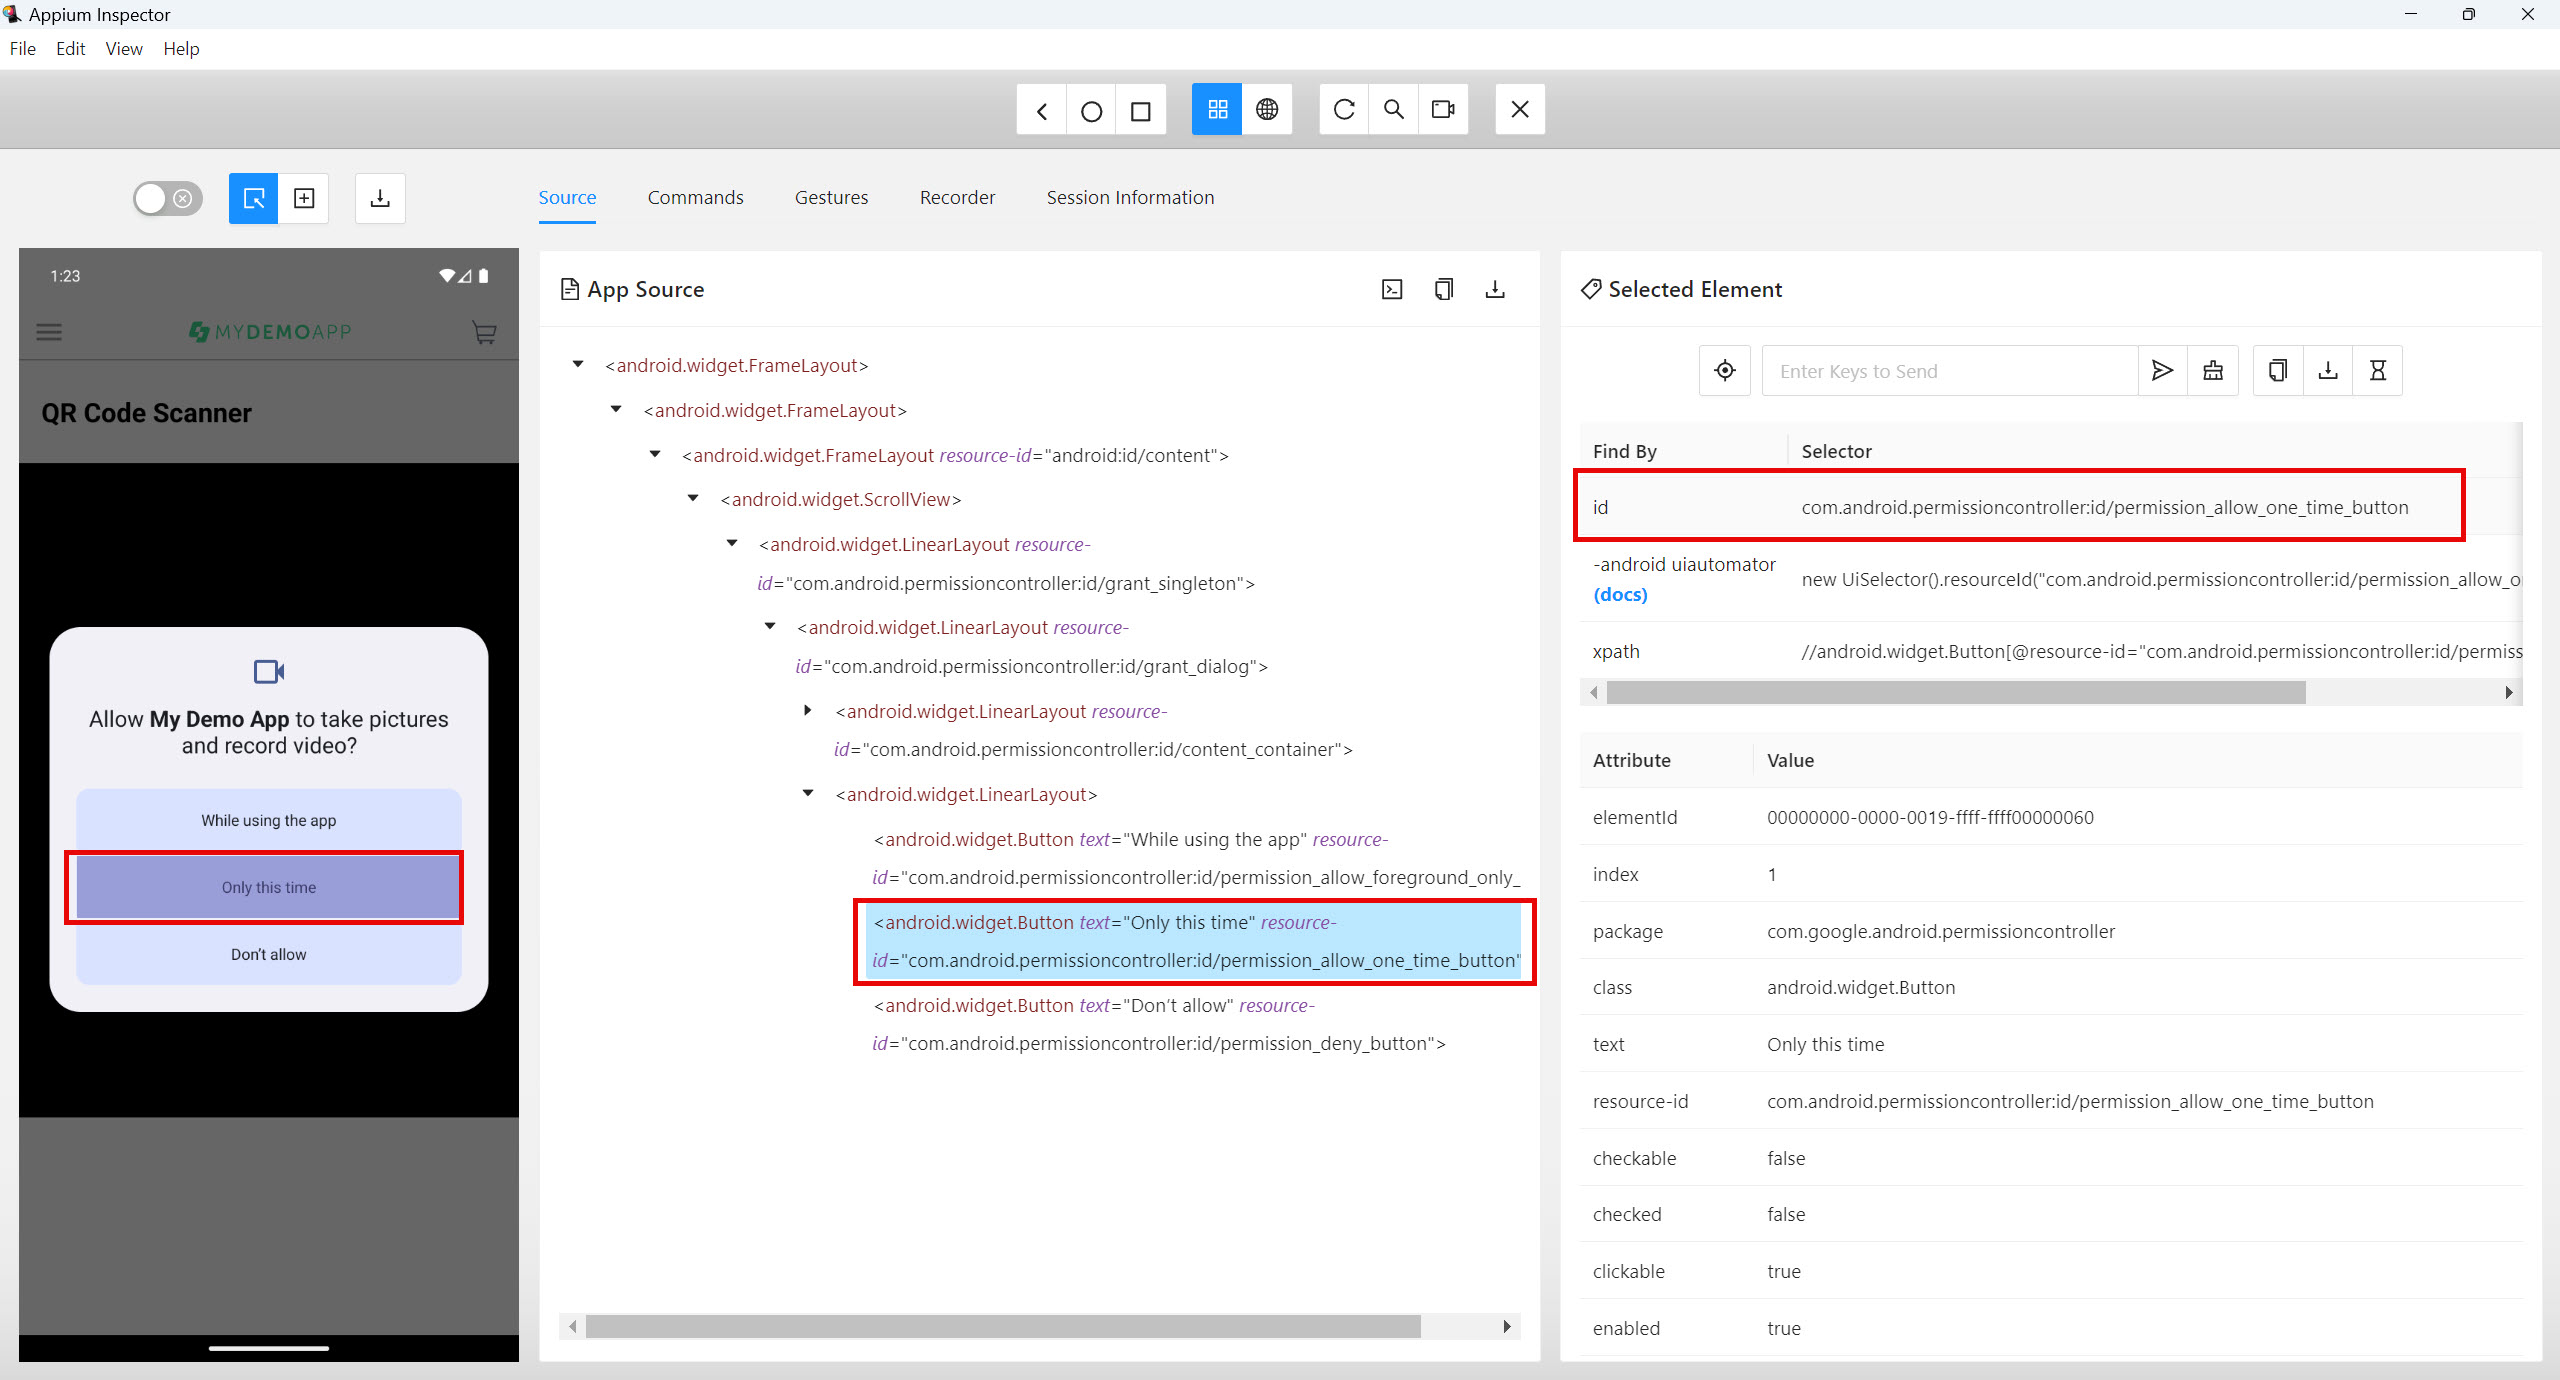
⭐️Demo code cho cách 2
Tại class BaseTest trong hàm setUpDriver chuyển thành options.setAutoGrantPermissions(false);
@BeforeTest
public void setUpDriver() {
    AppiumDriver driver;
    UiAutomator2Options options = new UiAutomator2Options();

    System.out.println("***SERVER ADDRESS: " + HOST);
    System.out.println("***SERVER POST: " + PORT);

    options.setPlatformName("Android");
    options.setPlatformVersion("14");
    options.setAutomationName("UiAutomator2");
    options.setDeviceName("Pixel_9_Pro_XL_API_34");
    options.setAppPackage("com.saucelabs.mydemoapp.android");
    options.setAppActivity("com.saucelabs.mydemoapp.android.view.activities.SplashActivity");
    options.setNoReset(false);
    options.setFullReset(false);

    options.setAutoGrantPermissions(false);

    try {
        driver = new AppiumDriver(new URL("http://" + HOST + ":" + PORT), options);
        DriverManager.setDriver(driver);
    } catch (MalformedURLException e) {
        throw new RuntimeException(e);
    }

    driver.manage().timeouts().implicitlyWait(Duration.ofSeconds(10));

}
Dùng click() để click vào vị trí element Only this time
package com.anhtester.Bai11_Notification_Permission;

import com.anhtester.common.BaseTest;
import com.anhtester.drivers.DriverManager;
import com.anhtester.keywords.MobileUI;
import io.appium.java_client.AppiumBy;
import org.testng.annotations.Test;

public class DemoPermission extends BaseTest {
    @Test
    public void testAcceptPermission() {
        DriverManager.getDriver().findElement(AppiumBy.accessibilityId("View menu")).click();
        DriverManager.getDriver().findElement(AppiumBy.xpath("//android.widget.TextView[@resource-id=\"com.saucelabs.mydemoapp.android:id/itemTV\" and @text=\"QR Code Scanner\"]")).click();

        //DriverManager.getDriver().findElement(AppiumBy.id("com.android.permissioncontroller:id/permission_allow_foreground_only_button")).click();
        DriverManager.getDriver().findElement(AppiumBy.id("com.android.permissioncontroller:id/permission_allow_one_time_button")).click();
        //DriverManager.getDriver().findElement(AppiumBy.id("com.android.permissioncontroller:id/permission_deny_button")).click();

        MobileUI.sleep(10);
    }
}
🔆Xử lý Permission trên iOS
Trên iOS, việc xử lý permissions có phần khác biệt so với Android. Bạn sẽ sử dụng XCUITestOptions để quản lý permissions.
Dùng hàm setAutoAcceptAlerts(true) để tự động chấp nhận permissions. Ngược lại thì đặt false.
Dùng hàm setAutoDismissAlerts(true) để tự động từ chối permissions. Ngược lại thì đặt false.
Và chỉ sử dụng một trong hai hàm thôi nhé.
IOSDriver driver;

@BeforeClass
public void setup() throws MalformedURLException {
    XCUITestOptions options = new XCUITestOptions()
        .setDeviceName("YourDeviceName") // Thay thế bằng tên thiết bị hoặc simulator
        .setBundleId("your.app.bundleId") // Thay thế bằng bundle ID ứng dụng của bạn
        .setAutoAcceptAlerts(true); // Tự động chấp nhận permissions

    driver = new IOSDriver(new URL("http://127.0.0.1:4723"), options);
}
Nếu bạn vẫn cần tương tác trên UI, bạn có thể sử dụng các phương thức tìm kiếm element của Appium để định vị và click vào các nút "Allow" hoặc "Don't Allow" trong permission dialogs.